AV Components: Audio and Video Wires
Run audio and video wires among your AV components as described in Wires for Audio and Wires for Video. Make sure you understand the Interaction of Video Signals before doing the actual wiring.
AV Components: IR-controlled
Run an IR Transmitter Wire from the Domain Controller to an IR Mouse that is attached to the AV component to be controlled.
If the AV component does not have discrete power on / off commands, Run a Power Status Wire back to a Domain Controller. This will insure that the AV component is on when it should be on and off when it should be off. by the Interaction of Video Signals.
Destiny Networks' supported AV Components
AV Components: Serial-controlled
Run an RS-232 Cable from the Domain Controller to the AV component to be controlled. Select the type of cable and the terminating connector from the Cable Selection Guide. Please test the cable with your PC using Hyper Terminal before connecting it to a Domain Controller.
Destiny Networks' supported AV Components
AV Distributed Audio System
From an architectural standpoint, there are two major types of systems:
Systems that run speaker wire to each room from a centralized set of amplifiers.
Systems that distribute the music over Cat 5E wire to the room and have a local amplifier in each room. In this latter case, most systems available today run an analog signal over the Cat 5 cable. The Cat 5E wire will be connected to a centralized AV switch. However, going forward you can expect to see more support for music over IP over Ethernet. In this case, the Cat 5E will be terminated on a LAN switch at the central location.
Luckily, you can run wire as follows and use either architecture above. For each room of distributed music, run both a Cat 5E wire and two (2) 18-2 stranded wires from a centralized location in your home to the location of the keypad or display in each room and then continue them on from there to the location of the speakers in the room. For some distributed audio systems, you will also need to run coax to the displays.
The next step is determining where you want the centralized location for the distributed audio switch to be. Typically, the music sources for you distributed audio system will reside in your theater room (or family room) as they will also supply music to that room, and those sources will want to share the same power conditioner and 110V circuit (or at least the same phase of 220V). For this same reason, you may want the audio switch in the same rack as the other AV equipment so it, too, can be easily connected to the same power conditioner.
Finally, connect the distributed audio system to the Domain Controller. For most distributed audio systems on the market, run an RS-232 Cable from the distributed audio system to the Domain Controller. For future IP-based systems, you will want to run an Ethernet Cable, but, as you can see, we recommend using the same wire for both cables - just the connector is different.
Destiny Networks' supported AV Distributed Audio Switches.
AV Distributed Video System
There are a number of ways to implement a distributed video system today - ranging from low cost and low quality to high cost and high quality, and there is an evolving standard that will provide high quality at low cost.
Modulate Sources onto an In-home Coax Cable
One way to do this is to modulate sources onto an in-home RG-6 coax cable that runs to all TVs in the house. This method has been done for years but provides the lowest quality signal of the methods offered. Most people would be unhappy watching a DVD using this method.
Run the video output of each source to be distributed into a frequency modulator. Run the outputs of the frequency modulators into combiners. Run the combiners into splitters and run the outputs of the splitters to each room of the house where you want distributed AV. At each location, you will need a tuner to select the channel of the frequency modulator whose source you want to view.
Distributed Composite with Line Level Audio
One of the simplest and most straight forward ways to distribute Video is by distributing composite video to each room using an AV switch and conventional RG-6 coax cable. The Xantech ZPR provides a reasonably priced switch for this application.
Run the composite video and analog audio output of each source to be distributed to the AV switch. Run three (3) RG-6 cables (1 for composite video and 2 for line level stereo audio) from the AV switch to each room. Connect the coax cables to an AV surround receiver such as the Denon 1805 or equivalent. Connect other local AV sources into the AV surround receiver, too. Connect the monitor output to your TV or other display and the speaker outputs to the speakers.
Bi-directional AV over Cat 5
Alternatively, there are systems available (such as the one from Pragmatic) that can send a bi-directional signal throughout the house on low cost Cat 5E wire.
Component or RGB over Coax and Digital Audio over Fiber
For a high quality solution, that you can implement today, you can distribute component video and digital audio.
From each source connect the Component or RGB-HV video output and the coax digital audio output to a matrix switch like the Matrix 3200 and 6400 switches made by Extron. Then pull coax cables for the Component or RGB-HV video signals and the digital audio signals to each distributed AV location.
DVI and Digital Audio over Fiber
For a high quality solution, you can distribute the digital video signal over DVI and the digital audio signal over fiber optic cable. DVI-to-fiber and digital audio-to-fiber converters are readily available. However, DVI / digital audio switches are not readily available today - making this a difficult architecture to implement.
Distributed AV over IP
One of the most exciting approaches is to send the AV signals throughout your home over IP (over Ethernet and sometimes WiFi 802.11g). We are presently on the leading edge of this new technology but it is being backed by vendors such as Sony and Microsoft, so it looks promising. One approach is to use a Microsoft-based Media Center PC which will soon distribute the content to "Extenders" which then use conventional analog and digital signals to drive the displays and local amplifiers. Microsoft claims that these extenders will be available by the end of 2004.
Summary
In summary, you may want to pull three (3) RG-6 coax wires (to distribute good quality Composite video and line level audio today) and one (1) Cat 5E wires to each location where you want with the opportunity to upgrade to great quality when distributed AV over IP matures. Regardless, you will want another Cat 5E for to connect the cable or satellite receiver to the telephone network. Alternatively, if you want great quality today, then you would want to pull multiple coax and/or optic fibers today.
AV Dropdown Screens and Lifts
To drop a screen or raise a lift Run a Relay Control Wire from the motor control unit of the screen or lift to the Domain Controller. Your screen or lift may also require a 12 volt supply. If so, Run a Low Voltage Power Wire, also.
Destiny Networks' supported AV Dropdown Screens and Plasma screen Lifts
AV Remote Control
The best solution is to use a remote control that communicates via RF instead of IR. RF penetrates through walls and doors. Therefore, normally, you do not need to pull any wires to use it. In some rooms large amounts of metal equipment blocking the path to the RF antenna on the back of the Domain Controller coupled with multipath interference (interference caused by a small portion of the signal bouncing off walls and other objects in the room and reaching the antenna slightly after the main signal) can cause a problem getting a reliable signal at all locations in a room. This problem can be easily corrected by connecting a coax cable to the antenna input and wiring it in front of the rack of AV equipment. For more informations please see Extending the Antenna with a Coax Cable
On the other hand, if you are using the IR signal from the remote control, you will need an IR receiver such as the Xantech 291-10 Hidden Link IR receiver. Place the IR receiver in view of the chairs you want to sit in and wire the IR receiver to the home controller.
If you are using a Plasma TV, you will need a Plasma-friendly IR receiver such as the Xantech 490-90 Plasma / Sunlight / Fluorescent Tube Light-Friendly Micro Link Receiver.
Destiny Networks' supported Displays: Touch Screen and other.
Configure the Universal MX-800 Remote Control.
Configure the Philips Pronto TSU-7000
Cameras
Run an Ethernet Cable from the IP camera to a 10/100 Ethernet switch at the head end. Run a Low Voltage Power Wire from the camera to a power distribution point for cameras (only) at the head end. The power supply for the cameras should be connected to an Uninterruptable Power Supply (UPS) which is then connected to the standby generator so that the video will always be available – even in the event of power failure.
Destiny Networks' supported Cameras.
Configure the Panasonic IP Camera
Curtains
Run a Relay Control Wire to the motor control unit of the curtain or drape. Note that the motor control unit will typically need 110V power, too.
Destiny Networks' supported Curtains and Shades.
Configure the BTX/BMC Curtain Control.
Configure the Somfy Drapery Controller.
Displays: PC-based
If the display is hardwired, then Run an Ethernet Cable from the display to the Domain Controller. Also, Run a Low Voltage Power Wire from the display back to a central power supply that can be surge protected or even connected to a backup generator.
Alternatively, if the display connects to the home controller via the WiFi wireless standard and uses battery power then Run a Low Voltage Power Wire to the docking station for the display and make sure that the display is near a WiFi access point or repeater.
Destiny Networks' supported Displays: Touch Screen and other
Displays: High end Remote Controls
The Domain 3000 can directly receive RF signals from the Philips Pronto TSU-7000 and the Universal Remote Theater Master MX-800. Therefore, the only condition is to make sure the remote control is within range of the Domain 3000.
If the remote control is too far from the Domain 3000 to receive a reliable signal, then use a Domain 2000 to receive the signal.
Destiny Networks' supported Displays: Touch Screen and other
Displays: Custom
For the Xantech SmartPad, Run an RS-422 Cable from the Xantech SmartPad to the Domain Controller. For more information, please see Xantech SmartPad LCD Touch Screen Panel.
The Elan and Vantage displays should be connected to their respective controllers with the following set of wires: a Cat 5E wire, an 18 gauge power wire, and, sometimes, a coax wire. Then, Run an RS-232 Cable from the Elan or Vantage controller to the Domain Controller.
Destiny Networks' supported Displays: Touch Screen and other
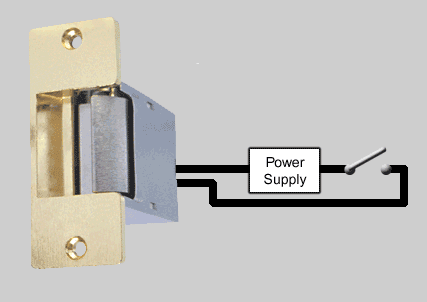
Door Strike
Run a Low Voltage Power Wire from the door strike to a power supply appropriate for the door strike (typically +12V) and then to a Normally Open relay on the Domain Controller or other relay ports controlled by the Domain Controller.
Destiny Networks' supported Door Strike
Driveway Entry Gates
Run a Relay Control Wire to relay input of the Driveway entry gate.
Destiny Networks' supported Driveway Entry Gates.
Fireplaces
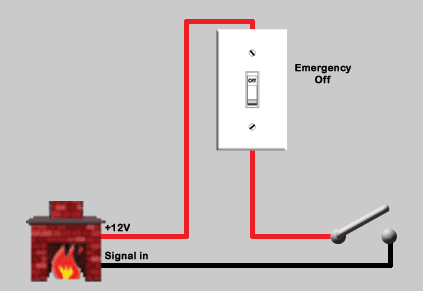
If you have a gas fireplace and it has an electronic ignition, then it can probably be controlled by your home controller, too. Run a Relay Control Wire to the ignition switch of the fireplace. This will allow the Domain Controller to turn it on and off. You may also want to add an emergency off switch.
|
|
Destiny Networks' supported Fireplaces
Fountains
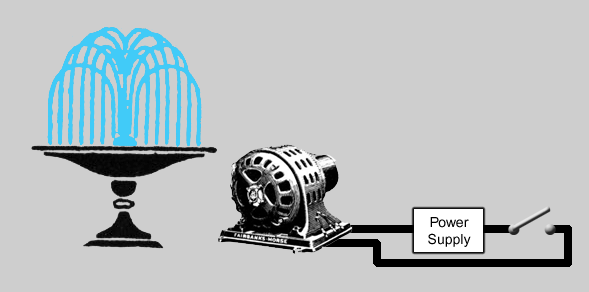
If the motor is rated at less than 1/3 horsepower and runs on 24V or less, then Run a Low Voltage Power Wire to the motor of the fountain (if the fountain is not attached to the house, you will want to use outdoor wire and, preferably, bury it in conduit). Connect the power supply (represented by the battery in the picture below) in series with the relay.
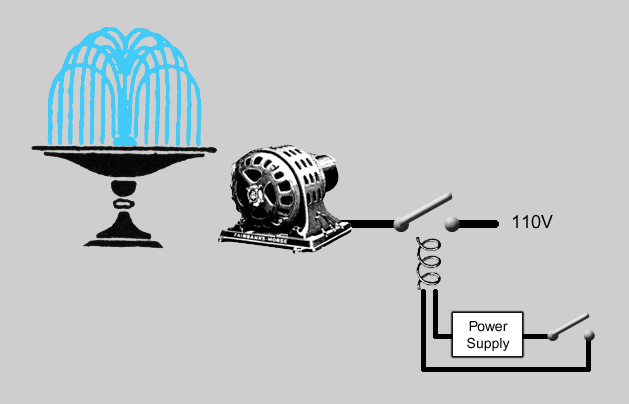
If the motor is rated at more than 1/3 horsepower or uses 110V power, then Run a Relay Control Wire to a power relay such as one of the Omron Mini Power Relay.
Destiny Networks' supported Fountains
Home Positioning System
New Construction
Run 22-4 stranded or solid wire from one or more central locations to the Area sensors, Entry/Exit sensors, door contract sensors, and GOB sensors throughout the house.
For the wires that go to Area sensors, connect the Power and Ground wires to a Din rail and, connect the Din rail to a reliable +12V power supply.
For the wires that go to all other sensors, connect them to Shubs and connect the Shubs to same +12V power supply as the one the Area sensors are connected to.
Connect the 110V input of the +12V power supply to an Uninterruptible Power Supply (UPS) and connect the UPS to a backup generator.
Place Wireless Shubs around the house such that every Area sensor is within 30 feet of at least two (2) Wireless Shubs. Ideally, the Wireless Shubs should be plugged into a 110V socket that is connected to the backup generator.
Plug an Asoka™ PlugLink™ Ethernet Wall Mount (PL9620-ETH) HomePlug adapter into a 110V socket near the Domain Controller. That 110V socket should also be connected to the backup generator. Run an Ethernet Cable from the HomePlug adapter to the LAN switch, which also connects to the Domain Controller.
Existing Homes
Place Wireless Area sensors and Wireless Entry/Exit sensors around the house.
Place Wireless Shubs around the house such that every Area sensor is within 30 feet of at least two (2) Wireless Shubs.
Plug an Asoka™ PlugLink™ Ethernet Wall Mount (PL9620-ETH) HomePlug adapter into a 110V socket near the Domain Controller. Run an Ethernet Cable from the HomePlug adapter to the LAN switch which also connects to the Domain Controller.
HVAC Systems
To control your HVAC system using multiple different interfaces such as your PC at home or work, keypads on the wall, remote controls, and intelligent display panels, use an intelligent HVAC controller to control your HVAC units and then Run an RS-232 Cable or Run an RS-485 Cable from the HVAC controller to the Domain Controller.
To find out more, please see the 3rd Party Applications for HVAC Controllers.
Destiny Networks' supported HVAC Controllers.
Configure the Aprilaire Thermostats.
Configure the RCS Thermostats.
Configure the Vantage Thermostats.
Keypads
Simple elegant keypads are an integral part of the intelligent lighting system and will be wired to it. Therefore, all you need to do is Run an RS-232 Cable from the lighting system to the home controller. For the specifics, please see 3rd Party Applications.
Supported Keypads.
Configure Keypads.
Configure LiteTouch 5000 LC Keypads.
Configure Lutron HomeWorks Keypads.
Configure Lutron Radio RA Keypads.
Configure Vantage Lighting System Keypads.
Configure X.10 Light Keypads.
Lawn & Garden
The home controller can help with your lawn and garden too. One of the initial applications is the control of the sprinkler systems. At present, no one makes a reasonably priced residential sprinkler system that provides a manual setting knob of the times that each zone is on AND provides a serial interface to the home controller. When someone makes that device, you will want a Cat 5E wire run from it to the Domain Controller. However, today, you have to choose between the two. If you have a lawn care service, you may want to choose the manual knob to set the times that each zone is on so that the lawn care service can change the watering cycles via the manual controls. However, if you will be setting the watering cycles yourself, then it is likely you will want the home controller to do it for you because it provides a very nice interface for setting the times and allows you to set the times from anywhere (even from work). In this case, Run Relay Control Wires from the sprinkler zone on/off solenoids to relays on the Domain Controller (or to additional relays next to the Domain Controller).
With the on/off solenoid of each zone connected to its own relay on the Domain Controller, you can control each watering zone separately and set up a timer event to define the time at which it turns on and the amount of time it stays on. This can be done on any PC-based display.
Lighting System
Run an RS-232 Cable from the intelligent lighting system to the Domain Controller.
Supported Lighting Systems.
Configure LiteTouch 5000 LC.
Configure Lutron HomeWorks.
Configure Lutron Radio RA.
Configure Vantage Lighting System.
Configure X.10 Lighting.
More Ports
If you run out of ports on the Domain Controller, you can add more with these 3rd party devices.
Configure the B&B Electronics RS-232 Converter.
Configure the Electronic Energy Controls Relay Controller.
Configure the Global Cache Controllers.
Configure the Lutron Homeworks COO Relays.
Configure the RCS Relay Controller.
Networking: Backup Power
Connect all networking equipment to one or more Uninterruptable Power Supplies (UPS) and connect the UPS to a backup generator. This will require knowing where to run the 110V wiring from the backup generator.
Networking: Ethernet
Run an Ethernet Cable from your structured wiring box to every location in your home where you think you may want high speed network connectivity. This would include locations where you expect to have a PC, a printer, or a display for controlling your home. It would also include any other electrical device that can be controlled by any other means today as most electronic devices are moving to Ethernet in the future.
Networking: Secure Connection
Connect the broadband side of your firewall to your cable or DSL “always on” Internet service. Connect the other side to a 10/100 Ethernet switch. Connect all of your network connections to that switch or to other 10/100 Ethernet switches that are connected to that switch.
The firewall should have the following features.
Packet filtering
Network Address Translation (NAT)
Dynamic Host Configuration Protocol (DHCP)
Domain Name System (DNS) (Optional)
The 10/100 Ethernet switch should have the following features.
No fans or other moving parts to make noise and cause reliability problems
LEDs for each port on the same side of the box as the plug for the port
Networking: Wireless
Wireless networking can be more difficult than vendors would lead you to believe. There are 4 issues to deal with:
Performance drops off quickly as you move further away from the access point.
Most access points distribute their signal better in the horizontal plane than they do in the vertical plane.
The wireless signal may not reach behind large metal objects like refrigerators and ovens.
The wireless signal may take multiple paths to get to your laptop by bouncing off of walls. This means that the same signal may arrive at your laptop at two slightly different times (the direct path gets there first and then the path that bounces off of wall gets there slightly later). This creates a distortion in the signal and can cause blind spots where your laptop may not work (and yet moving your laptop 6 inches may allow it to get the signal again).
Therefore, the best course of action is to create multiple mini wiring closets – each containing a wireless access point. Ideally, these closets should be within a 30 foot radius of the places you will normally use your laptop and they should never be directly above or below the places you want to use your laptop (assume that the 10 foot radius above and below the access point gives poor performance). Run a Cat 5E wire and an 18/2 power wire to each of these mini wiring closets, and make sure all access points are made by the same manufacturer because some of the value-added (i.e., non-standard) functions may interfere with each other.
Player Pianos
Run an IR Transmitter Wire from the piano to the Domain Controller. If the piano does not have discrete power on/off commands, then you will need to plug it into a current sensor and run the output of the current sensor back to one of the digital inputs on the Domain Controller.
Destiny Networks' supported Player Pianos
Security System
To arm and/or disarm your security system via multiple different interfaces such as your PC at home or work, keypads on the wall, remote controls, and intelligent display panels, Run an RS-232 Cable from the security system to the Domain Controller.
Supported Security Systems.
Configure the Apex Destiny 6100 Security System.
Configure the GE Interlogix (Caddx) Security System.
Structured Wiring
Structured wiring is wire that is built into your home such that it is wired to one or more central locations. This type of wiring is often referred to as "home run" wiring. At the central location it is often terminated in "can" or "wiring panel". In rooms, it is terminated in wall "jacks" or connected directly to equipment such as speakers.
In essence, every topic on this page is an application for structured wiring. Where, you have the following central locations:
Home Theater for AV equipment and the switches for distributed audio
Data network for cable or DSL modem, router, firewall, LAN switches and the Ethernet wires that go to PCs, printers, IP cameras, and displays (the cameras and displays should also have low voltage power wires coming from this location)
Telephone panel for the wires that go to all of the telephones in the house.
Lighting panels for the intelligent lighting systems (some of the relay controlled devices may want to use the relays of the lighting system, also)
Security panel for the security system
HVAC controller for the thermostats and damper control wires
Home controller for the systems that are controlled by serial, the IR receivers and transmitters, power status wires, and relay controlled devices.
Sensor hubs (Shubs) for the Home Positioning System
In addition to pulling wires from the central locations to the various rooms in your home, we recommend conduit to interconnect the central locations listed above and to interconnect some other important areas of your home such as the attic roof, the location where the telephone and cable service enter your home, all 4 outdoor walls of your house, the other side of your driveway (from your house), the end of your driveway, you favorite outdoor sitting area (such as by the pool), and the pool and spa equipment. "Smurf tube" makes a reasonably inexpensive way to do this for interior runs and regular PVC pipes work for outside runs.
Telephone System
Add a Panasonic KX-TA624 or KX-TDA50 PBX to your home and add Panasonic phones in all rooms in which you want intercom and paging capabilities. When building a new house, add locations in almost every room. The wires are inexpensive when the walls are open. Then, only buy the phones for the rooms in which you know you would like to have the intercom and paging capability. Run a Cat 5E wire from one of the PBX ports to the Domain Controller as this will enable future functionality for controlling your home.
Run a Cat 5E wire from one of the PBX ports to the Domain Controller as this will enable future functionality for controlling your home.
Destiny Networks' supported Telephone Systems
Water: Hot Water Recirculator
Plug the hot water recirculator pump into one of the switched circuits of an intelligent lighting system. Alternatively, you can plug it into power controller such as the Xantech AC-1. The latter then plugs into the 110V outlet. Run a 22/2 wire from the AC-1 to a normally open relay on the Domain Controller.
Now, the hot water recirculator pump can be controlled by any of the user interfaces that other devices are controlled by including elegant keypads, touch panel displays, and timer events.
Windows
Run a Relay Control Wire from the motor control unit of the window motor to the home controller. You will need access to 110V for the motor control unit.