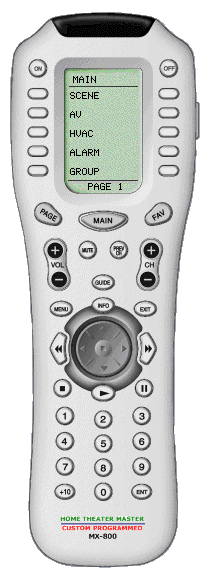
MX-800
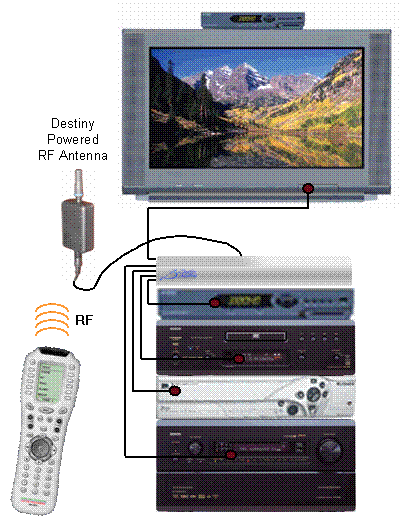
RF to Domain Controller Architecture
The MX-800 sends an RF signal which is received
by the MRF-200 RF receiver which then converts the signal to IR. The IR
output of the MRF-200 is sent to Domain Controller directly. The
Domain Controller controls the AV equipment - providing positive control
of all AV components and eliminating the need to write macros to set up
paths from sources to displays and speakers.
This architecture works extremely well and
permits the MRF-200 RF receiver to be placed in an optimal location to
receive the RF signal.
|
|
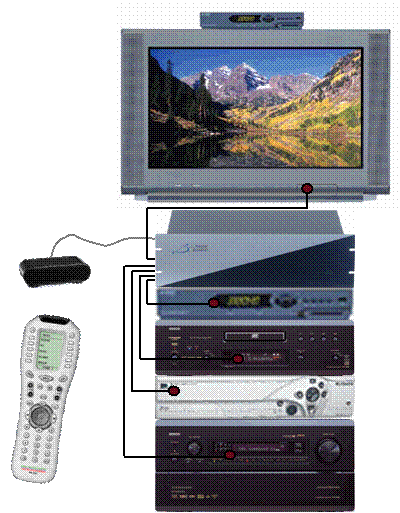
MX-800 IR to Domain
Controller Architecture
The MX-800 sends an IR code to an IR receiver
such as the Xantech Hidden Link. The IR receiver is directly wired to
the Domain Controller. Note that the IR commands from the MX-800 only
go to the Domain Controller. The Domain Controller controls the AV equipment.
However, be careful with this architecture
because when the IR signal is being sent from the MX-800 to the IR receiver,
it is also going to the other exposed AV components in the room (especially
the display). Recall that the IR signal from the MX-800 to the IR receiver
is an IR command intended for the Domain Controller (only). The Domain
Controller then sends commands to the AV components. However, the IR signal
from the MX-800 will continue to be emitted as long as the user has his
finger on the button. This signal will go to all exposed AV components
in the room and will interfere with the IR signal sent from the Domain
Controller to the AV components in the room. Therefore, the IR receivers
of all components must be completely covered for this architecture to
work.
For this reason, we
do not recommend this architecture. Please use the RF-based architecture
shown above.
|
|
Download the MX-800 / MX-850 Application
we Wrote for you
We wrote an application for the MX-800 / MX-850
that you can download and start using immediately. The path is shown at
the right.
Download the application:
MX-800
sending RF code 83.mxf
to your desktop so that you can load it into
the Pronto Pro editor below.
|
Click here
to go to our web site for the MX-800 / MX-850
http://www.destinynetworks.com/
Downloads/
Password_Protected/
Software for 3rd Party Products
/Universal Remote/ |
Load
the example program
Install and run the MX-800 Editor program
that came with the product.
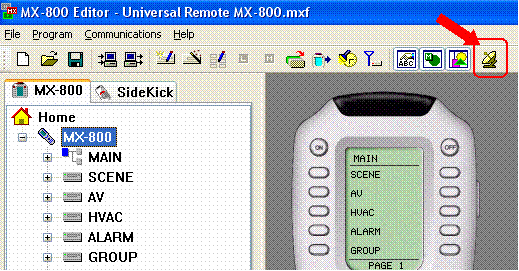
Run "Live Update" by clicking on
the icon of the satellite dish at the top right of the menu to get the
latest features and upgrades.
|
|
|
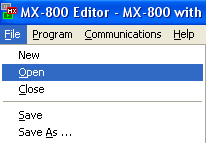
In the MX-800 Editor application, click "File",
"Open".
|
|
|
The "Open" menu will pop up.
Navigate up to where you save the file you
downloaded from our web site, select it, and click "Open".
|
|
|
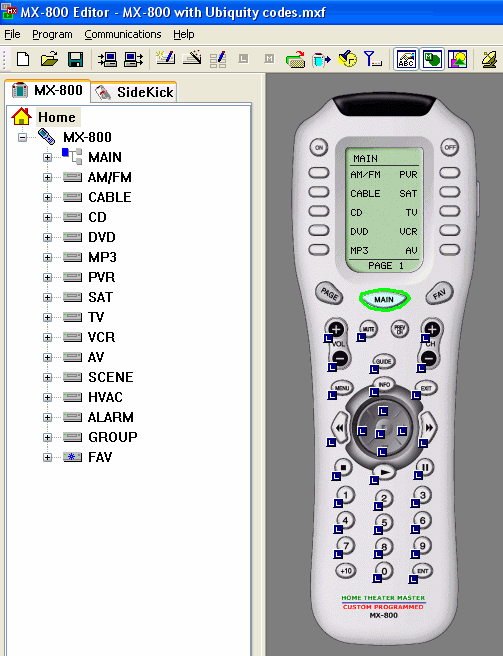
Main page 1 provides access to your AV entertainment
equipment.
Select a source using the button next to the
LCD screen on the remote. This will take you to the controls for that
device.
Nine AV sources have been set up for you ("AV",
on the bottom right, is not a source - it provides control of the video
picture and the audio mode). If your theater uses any subset of these
sources and does not have two or more of the same type of source, then
no programming is necessary - the Domain
Controller can receive the commands that are already loaded into the Theater
Master and translate them to control the actual equipment that exists
in your theater.
With the actual Theater Master remote control,
select the desired source, this will send out a short command from the
remote control requesting that the Domain Controller set up the path for
playing the selected device and will change the LCD display to the one
used to the control the selected source. The Domain Controller will do
the rest. It will set up the whole path from the chosen source to the
display and/or speakers.
Select "AV" to change the video
mode (e.g., anamorphic, widescreen, standard, or scroll through them)
and the audio mode (e.g., matrix, THX, stereo-5ch, stereo-2ch, DTS, Prologic,
Mono, or scroll through them). Note that the AV surround receiver, AV
display and/or video processor must support these modes for the commands
to work.
|
|
|
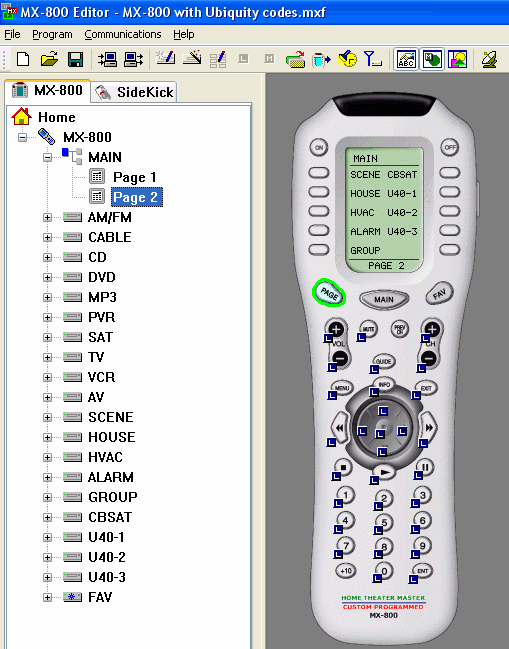
Main page 2 provides overall control of your
automated home with the four menu options shown on the left side of the
LCD screen of the remote control. Push the "PAGE" button on
the remote control to change to page 2.
When using the remote:
Select SCENE to change the Room scene, open
and close curtains, turn the fireplace on or off, and control handsfree
automation (if installed).
Select HVAC to set the temperature or to
change the mode (e.g., heating, cooling, auto, or off).
Select ALARM to arm or disarm the security
system.
Select GROUP to access some Groups of Actions.
Note that all of the IR codes have already
been learned for you.
In addition, on the right side of the screen
you see AUX 1, 2, and 3. These are place holders for additional AV sources.
It is likely that you will just delete them, but if you have more than
one source of the same type, you can use these to control that additional
source (refer to Add a
Second Source of the Same Type).
|
|
|
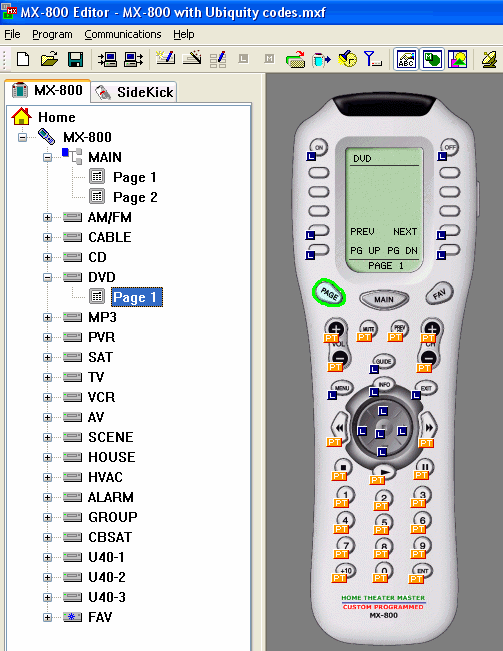
Back on page 1 of the Main page, if you double
click on the button to the left of the LCD screen where the label "DVD"
appears, the
controls for the DVD player will appear.
As indicated by the orange icon with the letters
"PT", note that most of the buttons "Punch Through"
to the main page. This is possible because the Domain Controller knows
what to do with the command as it pertains to the source that is playing.
Note that some of the Menu buttons are "Learned"
(as represented by the blue "L"). The MX-800 does not allow
these buttons to punch through. Therefore, they had to be programmed in,
but that work has already been done for you. The importance of the information
above is that you want to avoid creating your own pages. Instead, re-label
existing pages.
The MX-800 has 7 fewer hard buttons than the
Remote control that comes with the Domain Controller. For the DVD player,
the relevant buttons were added back as LCD buttons (see the "PREV",
"NEXT", "PS UP", PS DN" labels on the lower part
of the LCD display corresponding to the Destiny commands "Previous",
"Next", Page up" and "Page down" ). |
|
Delete
and/or Re-order some of the Sources
Before making any changes,
save the project under a different name.
Note, if you have to add additional AV devices
such as a second DVD player, then do not delete devices at this time.
First go to Add a Second
Source of the Same Type. Then return here to delete the unused devices.
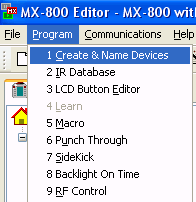
To delete some of the sources or re-order
how they appear on the MAIN pages, click on:
"Program",
"1 Create & Name Devices".
|
|
|
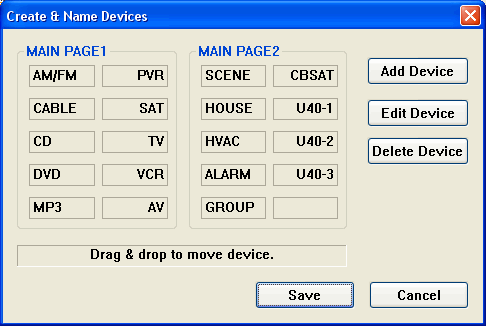
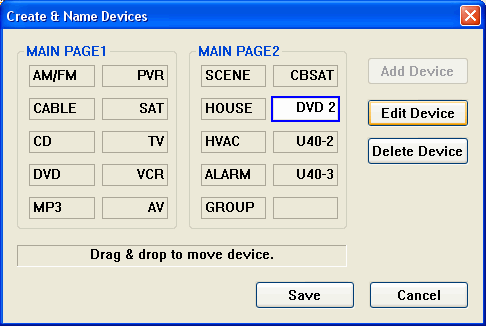
You will get the menu at the right.
To delete a source, click on its name and
click the "Delete Device" button. After you click "Save"
on this menu, the device will disappear (and the programming that we have
done for you will be lost for that device).
To Re-order the sources, click on a source
and drag it to another location. For example, you may want to populate
page one with all of the AV sources and home control options and then
hide page 2.
After deleting and rearranging the sources,
click save.
If you have removed all of the sources from
page 2, then "Hide" page 2 by right clicking on the word "Page
2" in the left hand window and selecting Hide.
|
|
Program
the Favorites
Use the MX-800 Editor application to add favorites
to the "FAV" pages. Note that Page 1 has a few on it already,
but it is likely that you will want different favorites and that the stations
will have different channel numbers.
With the MX-800 connected to the Domain Controller,
programming favorites is a snap because you do not have to add delays
(nor do you have to test them).
In the example at the right, CBS was programmed
into the MX-800 by doing the following:
Click the record icon
(circle icon at the top left - second from the far left). Click on the page of
the device you want to send commands to (in the example this would have
been the PVR). Click the number keys. Click Enter (the bottom
right key). Stop recording by clicking
the record icon. Click Save (the icon
of the floppy disk).
Often, there is nothing left to do but download
the program to the MX-800 and begin using it. Use Check My Destiny to
check your work.
|
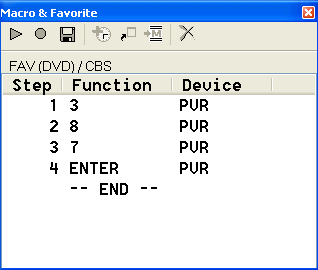
Bonus: Note that this
same macro can be used while watching the satellite receiver because the
Domain Controller will know what commands to send.
|
Configure
Ubiquity
If the theater has a second source of the
same type, you will have more work to do, but if the activities above
complete the programming of the MX-800, then you are ready to configure
Ubiquity and it will be simple, also.
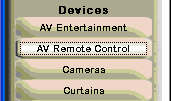
Go to the AV Remote Control layer of the Design
Module.
|
|
|
Click in the room in which the TV and/or Speakers
that you want to control is located (it does not matter where the sources
are located).
|
|
|
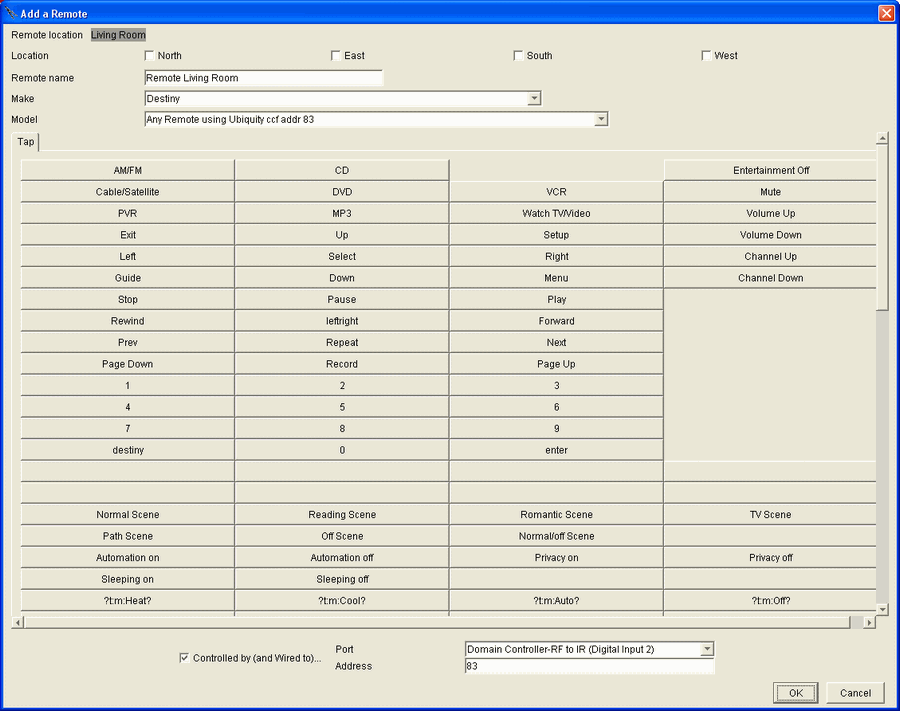
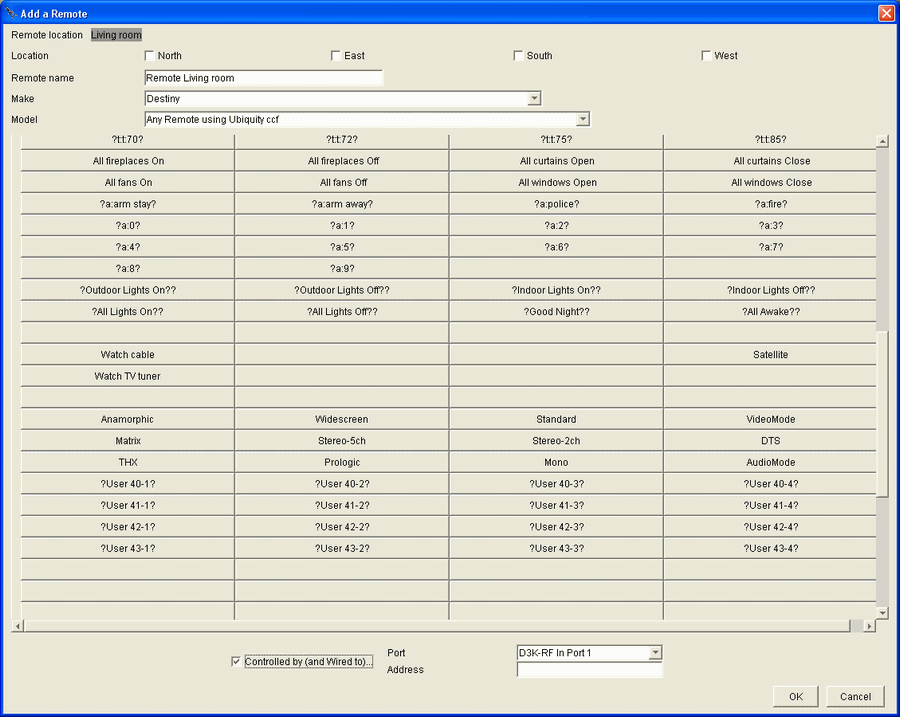
You will get the Add a Remote pop-up menu
shown below.
Select a "Location" if you like.
It is just an auto naming feature.
Change the "Name" if you like, but
the default will work unless there is already another remote by the same
name in this room.
The only "Make" that is available
is Destiny because we will be using the Destiny IR codes.
For "Model" select "Any Remote
using Ubiquity ccf addr 83".
At the bottom of the page, make sure "Controlled
by (and wire to)" is checked.
For the Domain 3000, select the RF to IR (Digital
input 2).
For the address, enter
83. The default set of IR codes that are in the file "Any
Remote using Ubiquity ccf addr 83" is address 83. If you are using
the Sports Bar application, you will see that other code sets are available.
The buttons in the middle of the menu represent
the buttons of the remote control, meaning that the IR code that gets
sent by the remote control is a number that is an index into this menu.
Then, each button uses the Action Tree to determine what to do - as illistrated
by the names on the buttons below. You do not need to know any of this
unless you have two sources of the same type (e.g., two DVD players),
or you want to control HVAC or security systems.
Click OK (you may have to resize the windows
task bar at the bottom of your display to get to the OK button).
You are done. Hook up the wires and use Check
My Destiny to check your work.
|
|
Note that this software
releases requires that the actual name of the HVAC zone and Security System
be configured into the menu. For those buttons that have question
marks ("?") at the beginning and end of the name, click on them
and use the Action Tree to select the appropriate command. Refer to UAPI Specification for RS-232 to figure
out the command that should be on each button. For example, the name "?t:m:Heat\n?
can be found in the UAPI specification to mean "Set the thermostat
to heating mode". Therefore, you would click on this button and use
the Action Tree to set the thermostat in the zone in which the remote
control is located to heating mode. Note that if you are not using this
remote control to control HVAC or security, then you do not need to do
this step. |
|
|
|
Add
a Second Source of the Same Type
Adding a second source of the same type (e.g.,
a second DVD player) is relatively straight forward and requires just
a little more effort then having just one source of each type, and still
much easier than writing macros for all of the different sources.
Open the "Create & Name Devices"
menu by selecting "Program", "1 Create & Name Devices"
from the drop down menu.
|
|
|
Click on one of the sources named User (i.e.
U40-1) that appears on the right of the menu (in the example at the right
U40-1 has already been changed to DVD 2).
Click the "Edit Device" button.
Change the name of that device to the name
of the second source (e.g. a second DVD player). You have just created
the button press that will set up the entire path for the second source.
Click "Enter" to complete editing
the name.
Then re-order the list by clicking on sources
and dragging them to other boxes as discussed above.
Do not delete and re-create any sources on
this page as you will lose the programming that has already been done
for you on these devices.
Click Save and it will appear in the list
on the left of the MX-800 editor under the "Home" tree of devices.
|
|
|
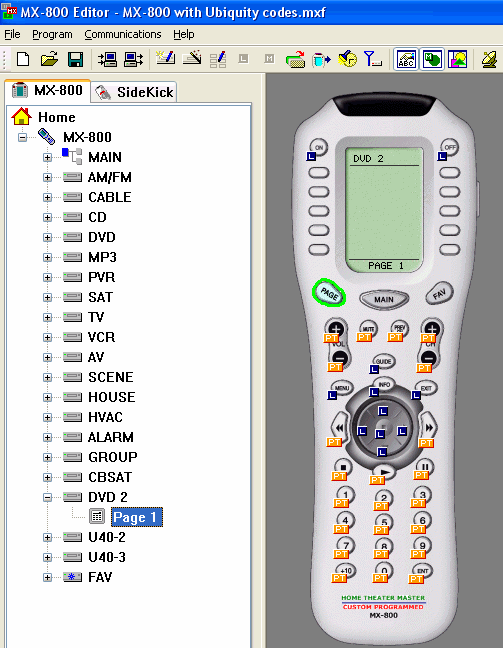
Click on the "+" plus sign on the
left of the device that was just re-named.
Click on Page 1. In our example, we added
a second DVD player named "DVD 2".
Note that all of the programming has still
been done for you.
However, the "ON" button of DVD
2 will not do anything at present. This is because the "U40-1"
Action Tree button in the Ubiquity software does not do anything - it
is just a place holder. We will have to change its action in the Design
Module.
Recall that the MX-800 is sending out Destiny
IR codes. Each code is unique and it is mapped to one of buttons on the
Ubiquity AV Remote Control menu in the Design Module (the one that looks
like a "field of buttons"). Essentially, the IR code that is
sent out is directly mapped to one of those buttons. Now, you get to choose
what that IR code does by clicking on the button on the AV Remote Control
menu and using the Action Tree to select an action.
Presently, the "ON" button of the
DVD 2 device on the MX-800 is sending out a code referred to as "User
40-1". We will now change the AV Remote Control menu in the Design
Module from User 40-1 to playing the DVD 2 player.
|
|
Add buttons to the representation of the
remote control on the AV Remote Control layer to play each DVD player
First, go to the AV Entertainment layer and
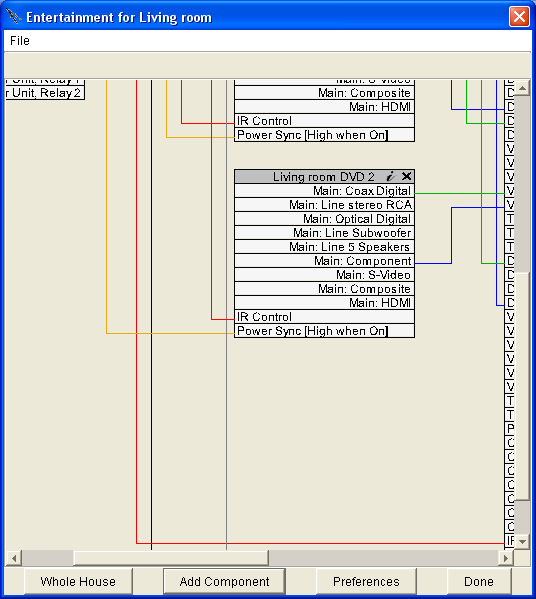
click in the appropriate rooms to get the "Schematic" menu.
Look at the name of the 2nd source.
Close the menu.
|
|
|
Now, go the AV Remote Control layer of the
Design Module.
Click on the dot representing the existing
MX-800 remote control (if you have not added one yet please do so by referring
to Configure Ubiquity) |
|
|
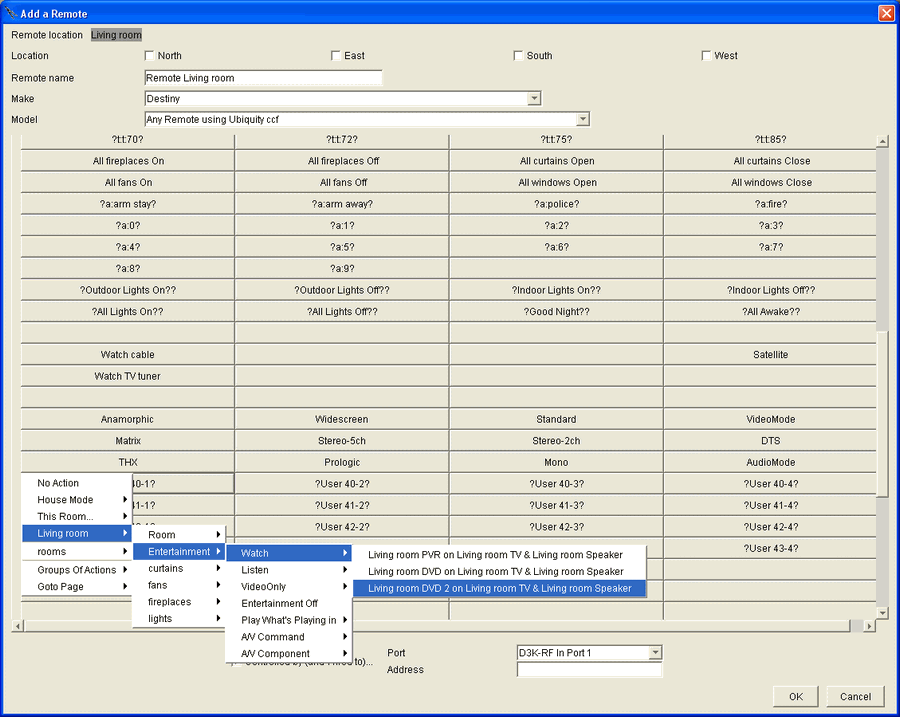
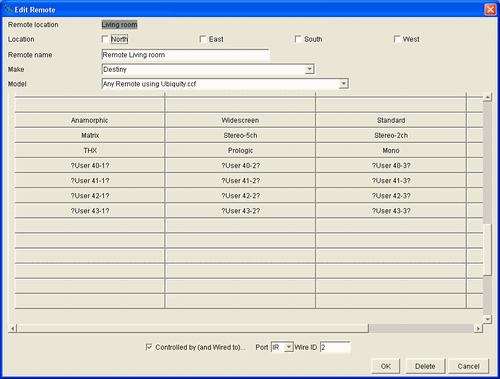
You will get the Edit Remote menu.
Scroll all the way down to the bottom of the
menu using the scroll bar on the right of the menu.
You will get the menu shown below.
Note that one of the buttons on the left is
labeled "?User 40-1?". The question marks around the name mean
that the software does not know what to do with this action name. That
is OK because we are about to change the action mapped to the IR code
that this button represents.
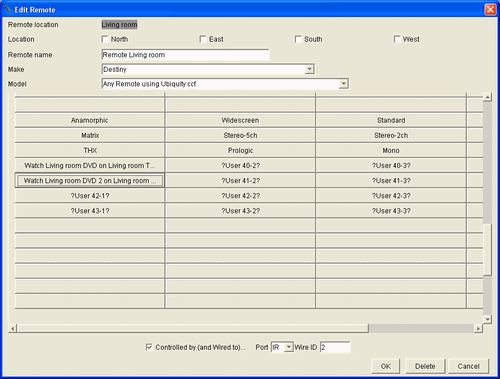
When the DVD 2 "ON" button is pushed
on the MX-800, an IR code will be sent to the Domain Controller that will
invoke the action on this button. We will now change this button to play
the DVD 2 player.
|
|
|
|
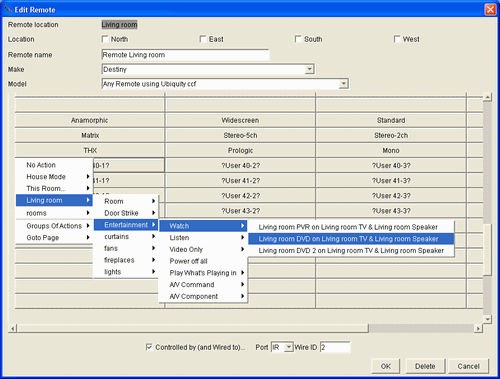
Click on the User 40-1 button to bring up
the action tree. Follow the path shown below to play the DVD 2 player.
Note that you cannot use "This Room"
because relative addressing for AV components requires that only one source
of each type can be available in a room.
|
|
|
|
You should also click on the existing "DVD"
button and give it an absolute path to the 1st DVD player. This way, if
you rearrange DVD players in the Ubiquity menus, good things will still
happen.
At this point, please return to Delete
and/or Re-order some of the Sources.
|
|
|
Create
your own Actions
If you want to create your own actions you
will need to assign an IR code to a button on the MX-800 and then select
the Action or Group of Actions that you would like that IR code to perform
on the Edit Remote menu - just like you did with
controlling a 2nd source of the same type.
Start with the Ubiquity Edit Remote Control
menu.
Go to the AV Remote Control layer of the Design
Module.
Click on the dot representing the existing
MX-800 remote control.
|
|
|
You will get the Edit Remote menu.
Scroll to the bottom using the elevator on
the right and you will get a menu similar to the one on the right (the
one on the right has been resized to show the left 3 columns in more detail,
so the column on the right has been covered up).
Note that there are a number of "User"
definable buttons and that each has a number on it representing the row
and column of the button. The "?" marks indicated that these
buttons do not do anything at the present. |
|
|
In our example, we will use the Action Tree
to change "?User 40-1?" to be "Living room DVD on Living
room TV & Living room speakers".
Click on the button labeled "User 40-1"
and follow the action tree as shown at the right. |
|
|
Do the same for button "User 41-1"
to watch the other DVD player, "DVD 2".
Now Ubiquity has an IR code that it can receive
to turn on each specific DVD player.
|
|
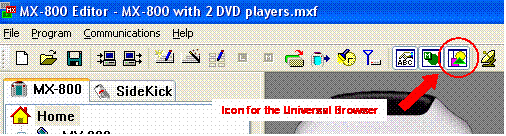
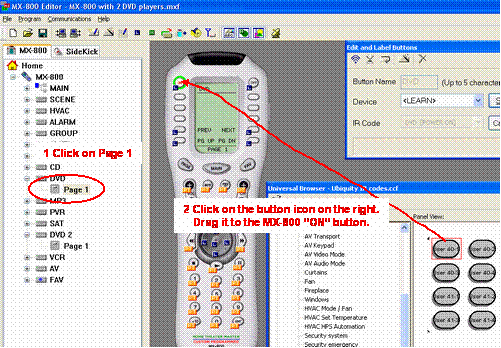
Add IR codes in the MX-800 Editor
To add IR codes, we need to open the ".ccf"
file of
the IR codes that Ubiquity can recognize.
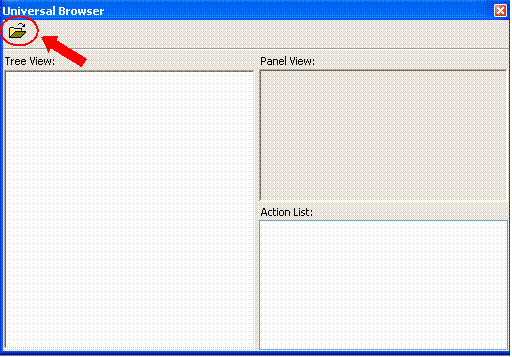
Click on the icon to open the "Universal
Browser" as shown at the right.
|
|
|
The Universal Browser menu will open and it
will be blank.
Click on the Folder icon in the upper left. |
|
|
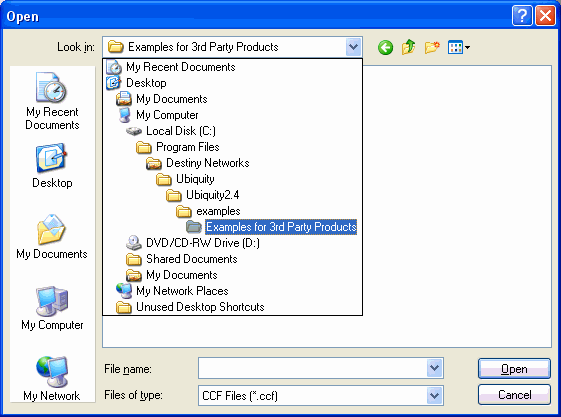
Open the "Examples for 3rd Party Products"
by following the path at the right (substituting the current version of
Ubiquity for "Ubiquity2.4"). |
|
|
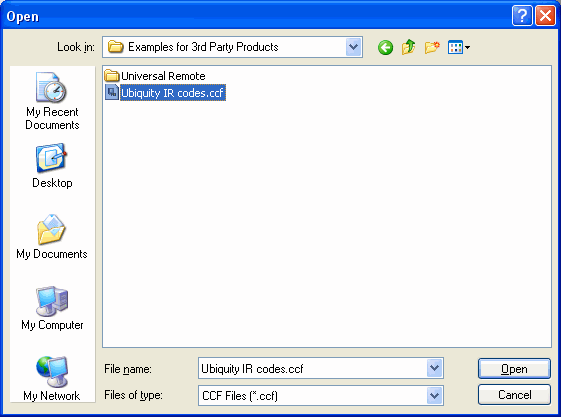
Click on "Ubiquity IR codes.ccf".
Click Open. |
|
|
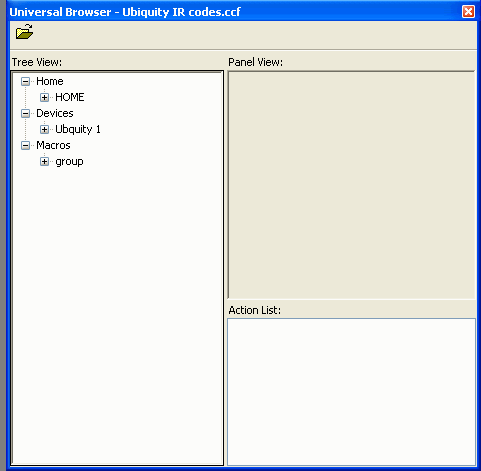
You will get a menu like the one at the right.
Click on the "+" plus sign to the
left of "Ubiquity 1" to expand the device codes. |
|
|
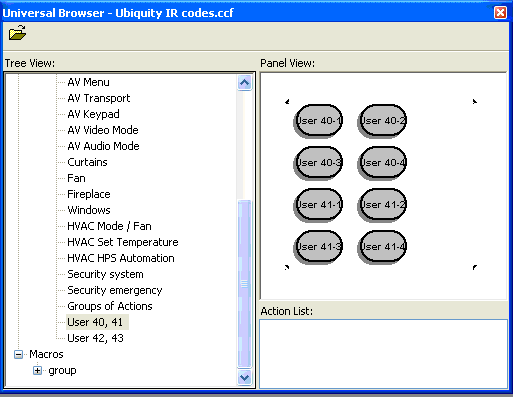
Scroll to the bottom of the window on the
left and click on "User 40, 41" and you will see the menu at
the right,
The buttons on the right have the IR codes
for user definable buttons in rows 40 and 41. |
|
|
Click on Page 1 for the 2nd DVD player. The
keypad buttons should have yellow flags next to them. If they are blue,
you are still on the MAIN page.
Click on "User 40-1" - the IR code
that will play the 2nd DVD player and drag it to the "ON" button.
You have now programmed that source (as shown at the right).
You are done. Download the program to the
MX-800 and use Check My Destiny to check your work. |
|