You can combine the Domain 3000 with a Pronto to do a great job of controlling a wall of displays. The benefits are
The intuitive touch screen of the TSU-7000 makes it easy for almost anyone to use. Select the TV display you want to control. Select the source for that display (if the display has multiple sources). And you are controlling the source with all of the transport, menu, keypad, channel, and volume commands.
Reliable control insures that the proper equipment is turned on as desired. An RF signal is sent from the Pronto the Domain 3000. The Domain 3000 does the rest.
Very easy to install. The program in the Pronto is already written for you. Therefore, just add the AV components to the Domain 3000 project and wire them up. Then, add a representation of a remote control for each display. You are ready to start controlling all of the displays.
Download the program we wrote for the Pronto from our web site by clicking here and then clicking on "Wall of Displays.pcf". You may also want to download the example Ubiquity project "Wall of Displays.ubq" to follow along with the information below.
Double click the .pcf file to open it with the ProntoProEdit NG program (requires that you have already loaded the Pronto software on your PC).
Pronto Home Page
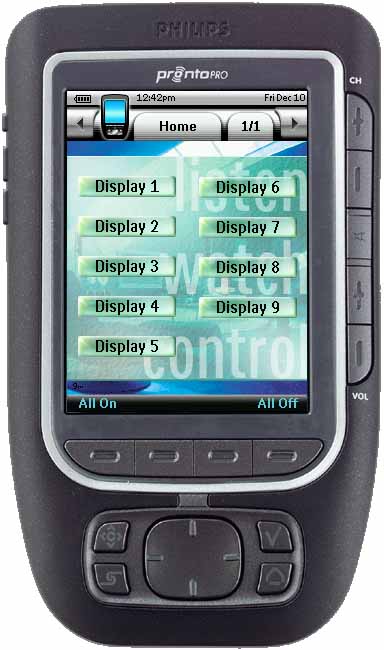
The Home page of the Pronto program we wrote provides buttons to jump to the control page for each display.
Touch one of the buttons to select a display to control.
Note, you can also execute some Groups of Actions (a.k.a., macros) such as the "All On" and "All Off" Groups of Actions shown at the right (above "Firm buttons" #1 and 4).
Select from Multiple Sources
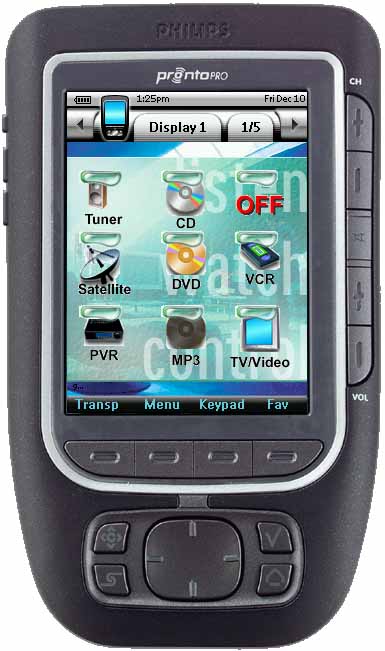
If a given TV display has multiple sources that can be viewed on it, then the default programming of the Pronto is what you want. After selecting a display to control (above), the Pronto will jump to the screen at the right.
When the user selects the source he would like to play on this display, a single code will be sent from the Pronto to the Domain 3000 and the Domain 3000 will do everything necessary to play the selected source on the selected display.
In addition, for most sources, the Pronto will jump to the Transport page of that device as shown below (for the Tuner and Satellite it will jump to the Keypad page).
Delete any buttons for sources that do not exist by clicking on the button you want to delete and typing the "Delete" key.
For most sources, the transport page will appear. The soft buttons perform actions as defined by the Device Description File of the source.
In addition, the hard buttons work for this source on this display, too.
The bottom left hard button is the "Exit" command as defined in the Device Description File of the source you are controlling.
The one above it is the "Guide" command. The middle 4 buttons are the Up, Down, Left, and Right buttons. And the second button from the bottom on the right is the Select button. To get to the Menu button, you need to go to the Menu page (the 2nd "Firm" button).
The "Firm" buttons let you move to other control such as menu and keypad, and to a "Favorites" page for each display.
You will need to set up the Favorites page as explained in Philips Pronto TSU-7000.
![]()
Only One Source
If there is only one source for a given display, then you can easily eliminate making the user select one of the sources.
In "ProntoProEdit NG", open the Home page as shown at the right.
Double click on the button of the Display that only has one source. The menu at the far right will pop up.
Select the existing jump (which jumps to a page of AV Sources), and click the "Delete Action" button to delete the jump to the AV Sources page.
Click the "Create Link" button.
You will get the menu at the right.

Expand the set of Ubiquity IR codes that corresponds with the Display you are controlling. That is, if you are working with Display # 1, then open "Ubq 1". Alternatively, if you are working with Display # 5, then open "Ubq 5".
Scroll down and expand "AV Sources" (under "Ubq <#>").
Select the type of source that goes to the display (for both cable and satellite receivers, you can select "CBL/SAT" - provided you only have one or the other, the Domain Controller will know which one it is).
Click "OK".

A link to the appropriate Ubiquity command will be added to the Display button.
Now, you also need to add a jump to the appropriate Transport or Keypad page.
Click the "Create Jump ..." button.
The "Create Jump" menu will pop up. It looks a lot like the "Create Link" menu at first.
Expand the Display you are working with (note for the Jump, we use the display where as for the Link we use the Ubq menus).
Select the page you would like to jump to when using this source.
Click OK.
You will also want to delete the buttons labeled "Sources" that appear on the Transport, Menu, Keypad, and Favorites pages of this display (as shown at the right).
You are done with this display.
Repeat the above for each display. If you have less than 9 displays, delete the extra buttons on the home page. If you have more than 9 displays, please send us an email at support@destinynetworks.com.
![]()
Configure the Design Module
Open the Design Module and create a new project.
On the Preferences layer, enter your location.
Add the Floor Area
Click on "Add Floor Area" and enter a name into the menu that pops up.
You do NOT have to click "Find" as we will free hand draw the wall of displays.
Click OK.
After adding the floor area, it will look like the area at the right. Note that the "Floor gif or jpg File" has not been added.
Add the Rooms Named as Displays
Go to the "Add Rooms" layer of the Design Module.
Change the Grid size to something like 40 pixels per grid by selecting "Edit" and "Grid Size" from the dropdown menu.
Draw a set of "Rooms" as if they were the displays on the wall as shown below. Name each "Room" as "Display <n>" as shown at the right.
You should end up with a project that looks like the wall of displays.
Add the Domain 3000
Go to the "Domain Controller" layer and add a Domain 3000 in to one of the rooms (it does not matter which room.

Add the AV Components
Go to the AV Entertainment layer and add the AV components into the appropriate "Rooms". The displays and speakers must be in the "Room" that has the same name as the display. All of the other components can go anywhere, but it is best to put the sources in the same room as the displays if they only go to the one display.
Recall that the Domain 3000 has 8 independent IR outputs. You cannot have two of the same devices on an output unless that device has multiple code sets.
Note that each IR output can support up to 2 IR emitters connected directly to it. If you want to control more devices from an IR output, you can use a Xantech 789-44 IR Emitter Splitter Amp.
Add the Remote Controls
If there is any tricky part to this project, this is it. Add a Destiny remote control to each room that a display is in. Number the remote controls the same as the room numbers.
These numbers represent IR codes sets (just as you might have an AV component with multiple IR code sets, our remote controls have multiple IR code sets).
The Pronto has been programmed by us to send IR code set 1 when controlling Display 1 (in room 1), IR code set 2 when controlling Display 2 (in room 2), etc.
Go to the "AV Remote Control" layer of the Design Module.
Click in the room named "Display 1". You will get a menu like the one below.
Click on "Controlled by (and Wired to) at the bottom and enter Address "1" as shown below.
Now, when the Pronto sends IR codes belonging to Destiny's IR code set one, the Domain 3000 will apply those commands shown below to the entertainment equipment in the room "Display 1".
Repeat for the other displays in the other rooms.
Add one more remote control for executing Groups of Actions such as "All On" and "All Off". Add this remote to any room, but make sure to give it "Address" 255 as shown below.
Now, everyone of these buttons can become a separate Group of Actions, and these Groups of Actions can be sent from the Pronto to the Domain 3000 as we will see below.
Click OK to add it to the project and we will come back to it after creating a couple Groups of Actions.
After adding all of the remotes, your project may look like the one below where Display 5 has the remotes for both IR code set 5 and IR code set 255 in it (two separate red dots).
Note that if you wanted, you could add one more remote to the project - the one representing the RC-1 remote control that shipped with the Domain 3000. You could add this remote to control any display you like by clicking in the appropriate room and entering the address that appears on the back of the remote. However, the RC-1 remote is best at just controlling one of the displays.
Create the Groups of Actions
Open the Browser GUI (File / Open Browser GUI).
Refer to Events to bring up the Events menu.
Create an "All On" Group of Actions like the one below by referring to Group of Actions.
Create a similar one for "All Off".
Note, you may want to test them while you are still in the Events menu.
You can check them with Check My Destiny.
Control the Group of Actions with the Pronto
Return to the Design Module and click on the little red square that represents the remote control with the address of 255.
Click on one of the buttons (such as the AM/FM button shown at the right) to bring up the Action Tree.
Select the "All On" Group of Actions.
Now, when the IR code is sent from the Pronto that corresponds to "Play AM/FM" on IR code set #255, then the Domain 3000 will invoke the "All On" Group of Actions.
Repeat for the All Off Group of Actions.
Click on one of the buttons (such as the CD button shown at the right) to bring up the Action Tree. Select the "All Off" Group of Actions.
Now, when the IR code is sent from the Pronto that corresponds to "Play CD" on IR code set #255, then the Domain 3000 will invoke the "All Off" Group of Actions.
Link the Pronto to All On and Off IR Codes
The final step is to "Create a Link" from the button on the Pronto that you would like to have send the All On and All Off commands to the IR code that the Domain 3000 wants to receive to execute those functions.
In this example, we chose to use "Firm button #1" to execute the "All On" command.
Double click on "Home Properties".
A representation of the TSU-7000 will pop up.
Click on "Firm button #1" (as shown at the right).
Click on "Create Link ...".
Link to:
Ubq 255
AV Sources
AM/FM
Click OK.
Now, when the user clicks this Firm button on the Home page, all of the displays will turn on.
Do the same for the "All Off" command.
At the right, you see "Firm button #4" selected in green on the Pronto. After clicking "Create Link ..." the menu at the far right opened. Then, you want to expand "Ubq 255", scroll down and open "AV Sources", and click on "CD" because sending that IR code will tell the Domain 3000 to perform the All Off Group of Actions.
Save the Pronto program under a different name and download it to the Pronto.
You are ready to control a wall of displays.