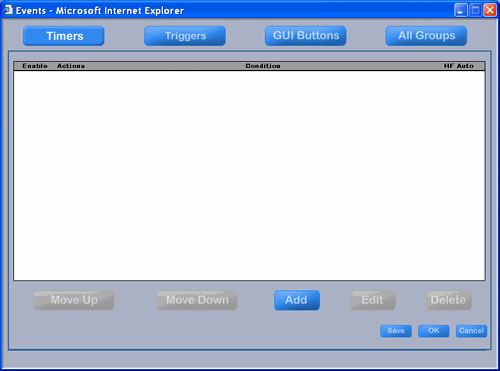
After opening the Events menu the "Timer" button at the top left will be active indicating that you are now working with Timer Events.
Add a Timer Event
To create a Timer Event, there are only two things that need to be done:
Select the action to be taken.
Define the time that the action should occur.
To create a Timer Event, make sure the button labeled "Timer" is active as shown above, and then click the "Add" button at the bottom middle of the menu.
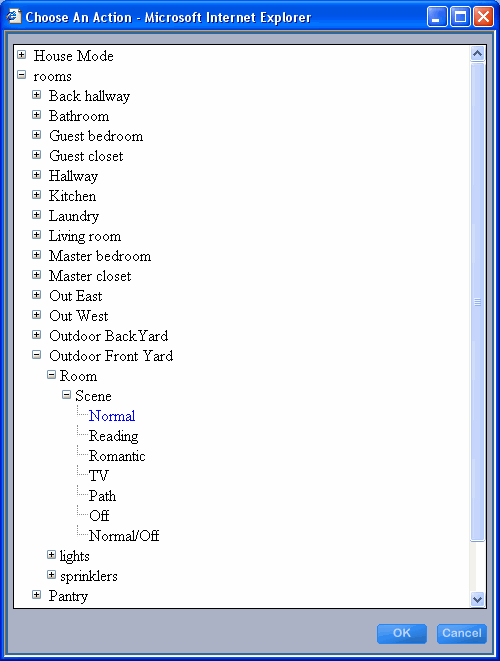
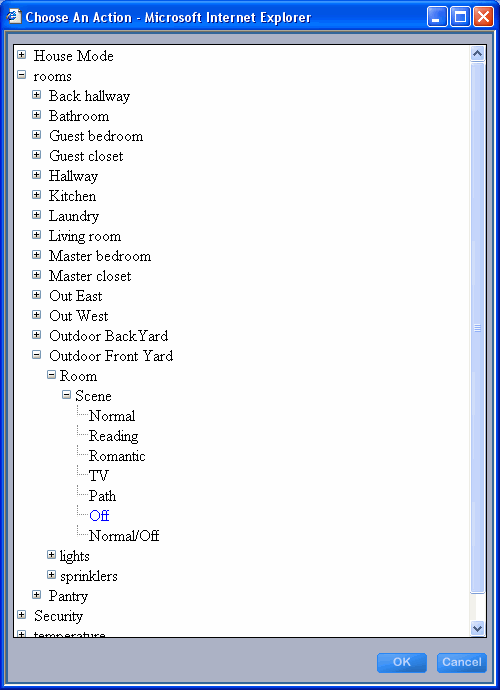
The Action Tree will pop up. With the Action Tree you have access to every device in your home that can be controlled and access to every way it can be controlled.
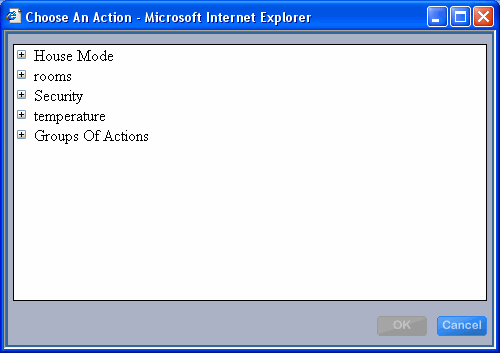
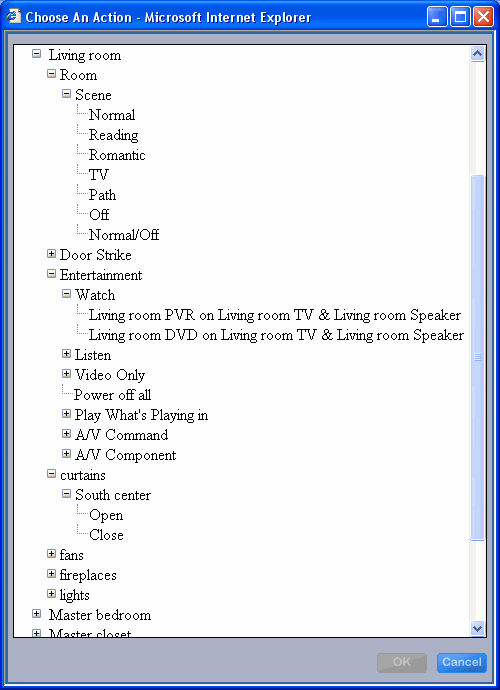
To see what can be controlled, click on the "+" plus signs to expand the lines (the "+" becomes a "-" when it is expanded). To access devices that exist in a room, expand the "rooms" line in the example above and then expand the room the device is in.
In the example at the right, the Living room has been expanded to show that you can do things such as:
Change the Room scene
Turn on the TV to watch the PVR
Open the curtains
etc.
Click on the Action that you want have happen. It will become highlighted in blue and the OK button at the bottom right will become available (note that in the example at the right, the OK is not available because none of the actions have been selected).
In this example, setting the Outdoor Front Yard to Normal scene has been selected and is highlighted in blue. Now the OK button is available.
After you have selected the action to be done, there is only one thing left to do - define the time that the action should occur.
Therefore, when you click the OK button ...
... you get the menu that allows you to specify when the action should take place.
Note that there are two types of Timer Events: "Time Triggered Events" and "Time Duration Events" as indicated by the radio buttons on the left of the menu.
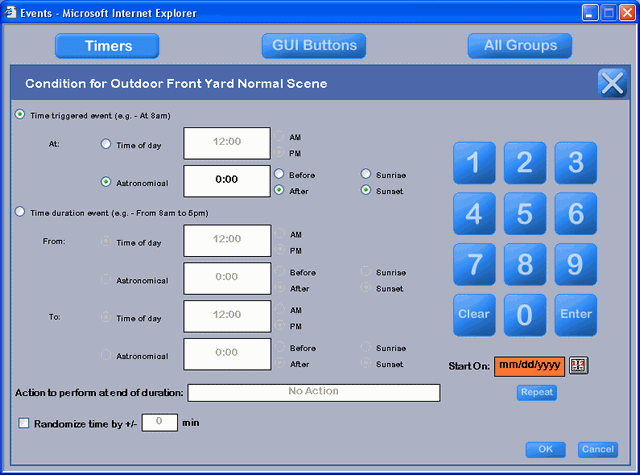
A Time Triggered Event causes some Action or Group of Actions to take place at a certain "time of day" or "time relative to sunrise or sunset".
However, it turns out that most home automation time-based events would like to have both a start time and a stop time (e.g., turn on the lights at dusk and turn them off at 11pm). Therefore, Ubiquity has created the concept of a Time Duration Event. For these types of events, this concept will save you lots of headaches in setting up the time schedule for when they will occur.
The other choice you have is whether to base the event on "time of day" or "time relative to sunrise or sunset" as indicated by the two radio buttons where ever you can set a time.
Please precede to one of:
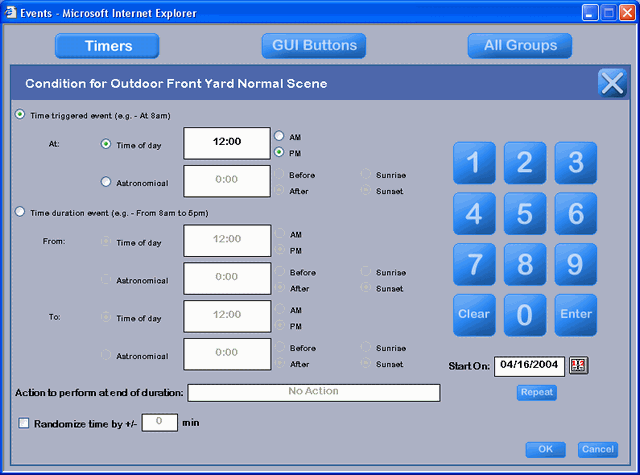
Time Triggered Event at a Time of Day
To create a Time Triggered Event that occurs at a specific time of day:
Click on the radio button on the left labeled "Time triggered event (e.g. - At 8am)" - it is the default selection when the menu pops up.
Click the radio button to the right of the word "At" labeled "Time of day".
Click in the white text box (where the time 12:00 appears in the example). The box will turn orange.
Use the keypad at the right to enter the time of day in hours and minutes at which you would like the event to take place.
at the lower right of the keypad (you must do this or you will lose the number you entered). The text window will turn white indicating that it has taken the new time.
Click on either the AM or PM radio button.
Proceed to Starts On.
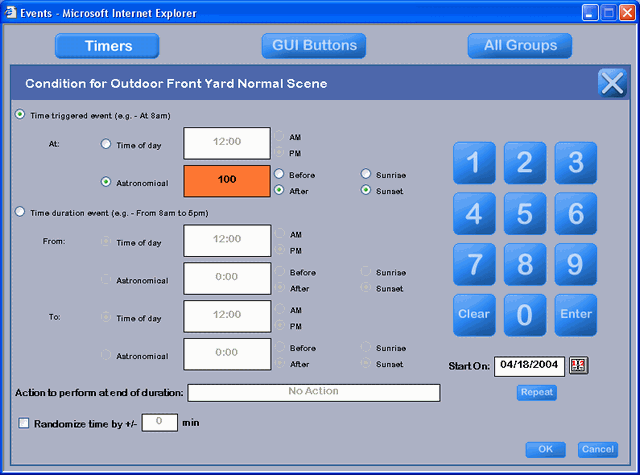
Time Triggered Event at a Time Relative to Sunrise or Sunset
To create a Time Triggered Event that occurs at a time relative to sunrise or sunset:
Click on the radio button on the left labeled "Time triggered event (e.g. - At 8am)" - it is the default selection when the menu pops up.
Click the radio button to the right of the word "At" labeled "Astronomical".
Click in the white text box (where the default time of 00:00 appears initially). The box will turn orange as shown in the example.
Use the keypad at the right to enter the time of day in hours and minutes at which you would like the event to take place relative to sunrise or sunset. In the example, 1 hour has been entered.
at the lower right of the keypad (you must do this or you will lose the number you entered). The text window will turn white indicating that it has taken the new time.
Select whether you want the event to occur "before" or "after" by clicking the appropriate radio button.
Select whether you want the event to occur relative to "sunrise" or "sunset" by clicking the appropriate radio button. In the example, the event will occur one hour after sunset.
Proceed to Starts On.
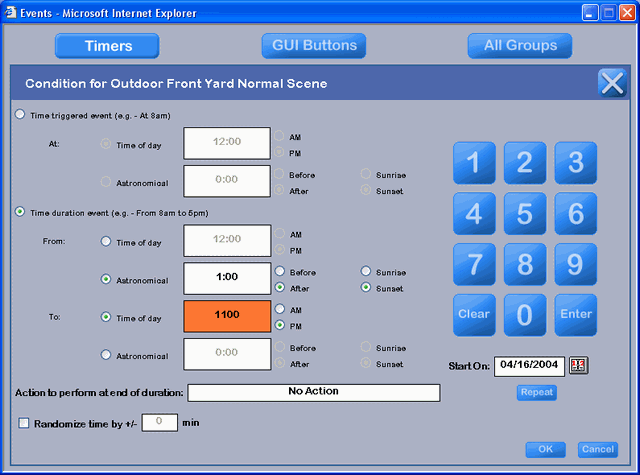
Time Duration Event
To create a Time Duration Event:
Click on the radio button on the left and half way down the page labeled "Time duration event (e.g. - From 8am to 5pm).
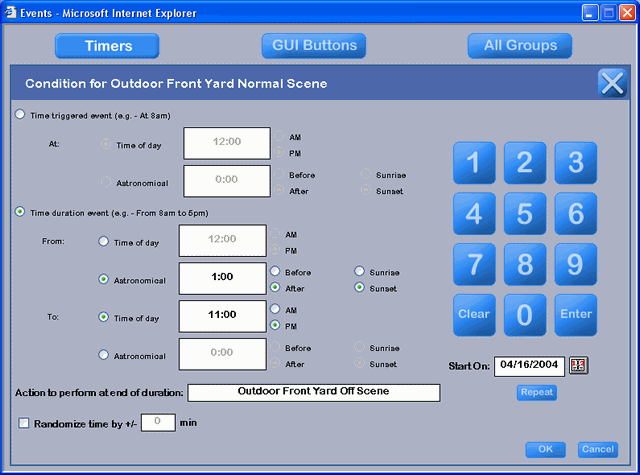
Enter the "From" time - which can be either from some time of day or from some time relative to sunrise or sunset - using the same options as explained above (make sure to click "Enter" at the lower right of the keypad after entering a number). In the example to the right, the time "From one hour after sunset" has been chosen.
. For example, if a light is being controlled by a Time Duration Event and you change the Room Scene in that room, the light will not change. This allows you to turn a couple of outside lights on a set time and they will stay on even if you have company and want to change the Room Scene to off after they leave.
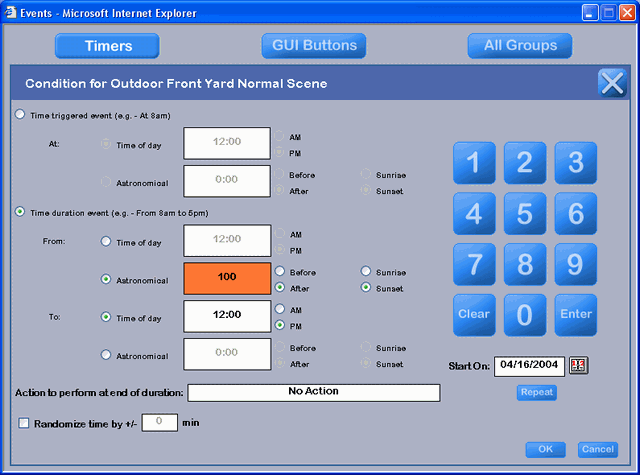
Enter the "To" time. In the example to the right, the time "To 11pm" has been chosen.
Back at the beginning, you chose an action to perform when the event begins. For duration events, you also have to tell the software what action to perform when the event begins. To do this, click in the long white text box to the right of the words "Action to perform at end of duration" and where the words "No Action" exist in the example.
When you click in the long white box above to choose an ending action for the duration event, the Action Tree will pop up and it will automatically open to the most logical place for selecting the ending action for the event.
Click on the ending action.
Click OK.
After clicking OK, you will return to the conditions menu with the Time duration information filled out.
Proceed to Starts On.
Starts On
The white text box to the right of the words "Starts On" under the keypad enable you to set the starting date for the Timer Event.
If you click on the text box it will turn orange and show you how the date should be entered - as seen in the example at the right. Use the keypad above it and click on the numbers that represent the date you would like the event to start on. Note that you must enter all of the numbers including leading zeros.
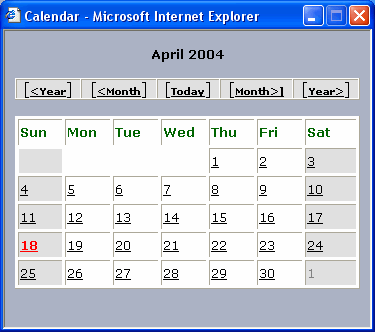
The easier and more intuitive approach is to click on the icon of a calendar to the right of the text box.
Clicking on the calendar icon on the menu above brings up the calendar at the right. Use the "<Year" on the left and the "Year>" on the right to navigate to the year at which you would like to start the event and the "<Month" and "Month>" to navigate to the month. Get back to the present month by clicking the "Today" button. Today's date will be in red as shown at the right.
Click on the day on which you would like the event to begin. The calendar will disappear and the date will be entered into the text box to the right of "Start On" shown above.
Repeat
Most Timer Events you will want to repeat regularly. You have a great deal of flexibility here.
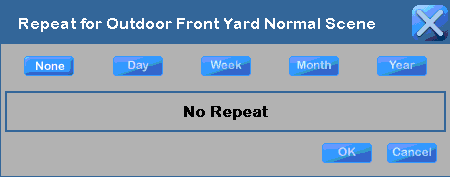
Click the button labeled "Repeat" under the keypad. You will get the menu at the right identifying the fact that the Timer Event will not repeat at present.
Choose how you would like the event to repeat:
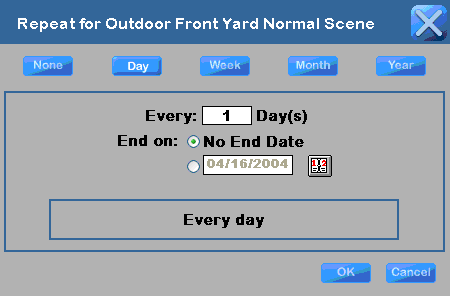
Day
Click on the "Day" button to repeat the event every day or every 2nd day or every 3rd day, etc.
The menu will default to every day, as indicated by the 1 in the box.
To change how often the event repeats, click on the white text box (shown with a "1" in it in the example on the right). A keypad will pop up. Click the number of you want where clicking a 2 will mean every 2nd day, a 3 will mean every 3rd day, etc.
Click "Enter" on the pop up keypad.
Often, you want the event to continue repeating forever - which is the default as indicated by the selection of the "No End Date" radio button. However, you can enter a date to end on by clicking on the lower radio button and entering a date in the same way you entered a date for "Start On".
Click OK.
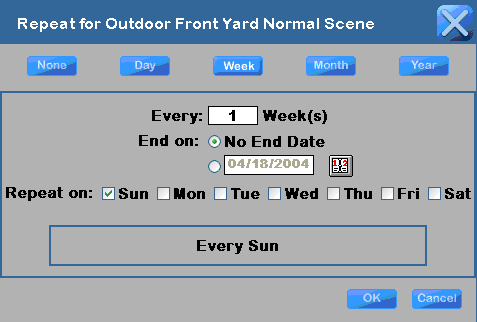
Week
Click on the "Week" button to repeat the event every week or every 2nd week or every 3rd week, etc.
The menu will default to every week as indicated by the 1 in the text box at the top of the menu. To change how often the event repeats, click on the white text box and do the same thing you would do for repeating every 2nd, 3rd day.
Leave the default on "No End Date" or enter a date to end on by clicking on the lower radio button and entering a date in the same way you entered a date for "Start On".
Click the days of the week that you would like the event to occur on. You can click multiple days. At least one day must be selected. Therefore, you cannot uncheck today's date (the default when you open the menu) until you have checked another day.
Click OK.
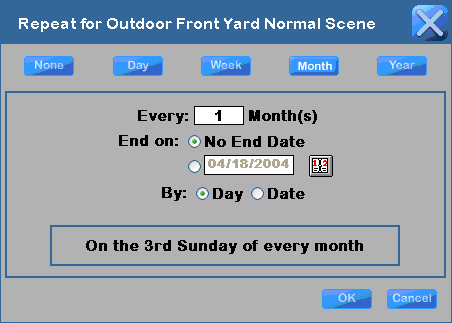
Month by Day
You can repeat by "Day" of the month or by "Date" of the month. The Day of the month refers to day of the week on a monthly basis (e.g., on the 3rd Sunday of every month).
Click on the "Month" button to repeat the event every Month or every 2nd Month or every 3rd Month , etc.
The menu will default to every Month as indicated by the 1 in the text box at the top of the menu. To change how often the event repeats, click on the white text box and do the same thing you would do for repeating every 2nd, 3rd day.
Leave the default on "No End Date" or enter a date to end on by clicking on the lower radio button and entering a date in the same way you entered a date for "Start On".
The day of the month that the event starts on will determine the day it repeats on. To change this, change the "Start On" date.
Click OK.
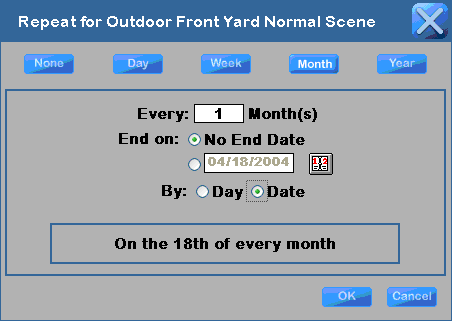
Month by Date
You can repeat by "Day" of the month or by "Date" of the month. The Date of the month is something like on the 18th of every month.
Click on the "Month" button to repeat the event every Month or every 2nd Month or every 3rd Month , etc.
The menu will default to every Month as indicated by the 1 in the text box at the top of the menu. To change how often the event repeats, click on the white text box and do the same thing you would do for repeating every 2nd, 3rd day.
Leave the default on "No End Date" or enter a date to end on by clicking on the lower radio button and entering a date in the same way you entered a date for "Start On".
The date of the month that the event starts on will determine the date it repeats on. To change this, change the "Start On" date.
Click OK.
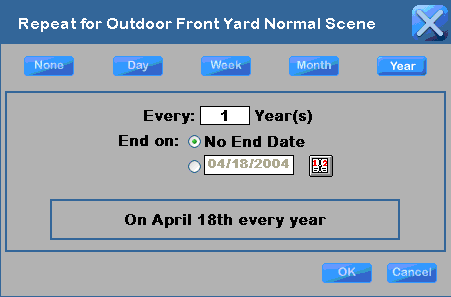
Year
Click on the "Year" button to repeat the event every Year or every 2nd Year or every 3rd Year , etc.
The menu will default to every Year as indicated by the 1 in the text box at the top of the menu. To change how often the event repeats, click on the white text box and do the same thing you would do for repeating every 2nd, 3rd day.
Leave the default on "No End Date" or enter a date to end on by clicking on the lower radio button and entering a date in the same way you entered a date for "Start On".
The date of the Year that the event starts on will determine the date it repeats on. To change this, change the "Start On" date.
Click OK.
Randomize
You can randomize the starting time of a Time Triggered Event or both the starting and the ending times of a Time Duration Event.
Select the randomize function by clicking the checkbox labeled "Randomize time by +/-" at the bottom left of the menu.
Click in the text box. It will turn orange. Use the keypad to enter the number of minutes to randomize the starting (and ending) time. Ubiquity uses a linear algorithm on a one minute basis calculated daily when the event is created.
Click OK to exit the menu.
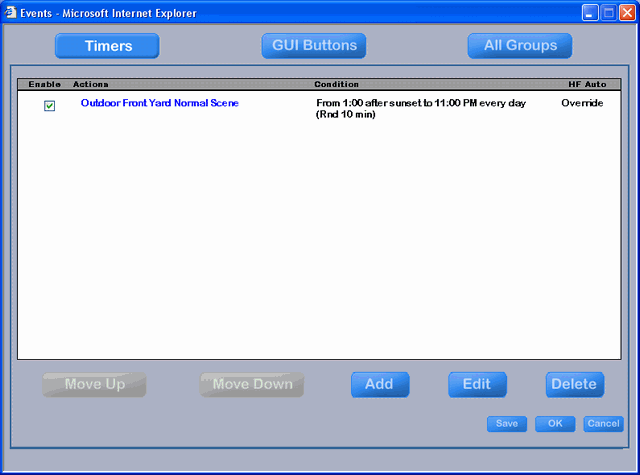
Timer Event Added
Your new Timer Event will be added to the list of Timer Events.
On the left, the check mark means the Timer Event is enabled. You can click this to disable the Timer Event (perhaps while you are on vacation). The event will remain in the menu but will be grayed out to show that it is no longer active.
The Action will show the action to be performed. This can either be a single action or a Group of Actions. In the latter case there will be a "+" to the left of it and it can be expanded to see the individual actions in the group.
The Condition specifies how often the Timer Event will occur.
"HF Auto" stands for handsfree automation. If you do not have handsfree automating in your home, you do not care about this information. For those home with handsfree automation, Time Triggered Events do not affect handsfree automation. Therefore, this column will say "NA" for not applicable. However, Time Duration Events do affect handsfree automation in that they override handsfree automation for the device or devices specified. See below for more information.