The Domain Controller supports UPB switches and keypads and connects to the UPB Powerline Interface Module (PIM) via an RS-232 interface - . You cannot connect the Domain 3000 or Domain 2000 serial ports to the PIM because the PIM requires the DTR input on the RS-232 interface to be high and the Domain Controllers do not support this feature. Note that it may be possible to use the Lantronix UDS100, but we were not able to do this with a commercially available DB-25 to DB-9 converter cable.
Overview:
Installation
Ubiquity Software
UPB Architecture
because it requires the DTR signal of the RS-232 cable to be pulled high. This is an extremely uncommon cable requirement and is not supported by the Domain Controllers (or most other controllers, for that matter).
Therefore, you must connect the UPB Powerline Interface Module (PIM) to the Domain Controller via the Lantronix USD 200 Ethernet-to-Serial converter.
All keypad and light switch pushes are sent to the Domain Controller and can be used to control other devices in the home.

Domain 3000 Wiring
Connect a straight through RS-232 cable from a serial port on the back of the Lantronix USD 200 to the serial port of the UPB Powerline Interface Module (PIM) as shown.

Installation of the UPB Powerline Interface Module (PIM)
Use the UPB "UPStart" application to set up you UPB network - giving every light switch a User ID (UID). Download UPStart.
Create "Links" as you normally would to define lighting scenes within the UPB lighting system. You will have the option of the Domain Controller responding to these links, as well. For example, you can create a link from a UPB keypad to set a lighting scene in the room. Then, The Domain Controller can be made to respond to the same link to turn on the entertainment system and/or close the curtains in the room.
Create additional Links to generate actions to be handled only by the Domain Controller (as explained below).
Note that the Domain Controller cannot transmit link numbers but can control the UPB switches and dimmers directly (as explained below, also).
In UPStart, select "File / Print" to print the list of UPB devices, their unit ID's, and room names. You will use this list below to enter the addresses of the lights into the Design Module.

Keypads and Switches must send Links
Keypads and wall dimmers and switches must be set up to send links. On the Transmit Components tab, create links by clicking the button on the lower left "Open Link Name Table". Then select the link to send with the dropdown menus as shown at the right. Click the "Mode" button to the right of the dropdown and select "Link Activator" or any other option that sends the link when the keypad or light switch button is pressed.

Keypads and Switches must send Link Packets, not Direct Packets
Keypads and wall dimmers and switches can send "Link" packets or "Direct" packets. For the Domain Controller to see the links, . This setup option is done in UPStart in the Advanced menu tab as shown at the right.
Note that some keypads default to Link and some light switches default to Direct. The ones that default to Direct must be changed to Link.

Test the communication of the Powerline Interface Module (PIM)
Connect the Powerline Interface Module (PIM) to your PC with a commercially bought RS-232 cable, and use UPStart to verify that all modules respond.

Test the cable
Connect the actual installed RS-232 cable to your PC and the PIM. Run the UPStart verification test again.
Disconnect the cable from you PC and connect it to the Lantronix It uses the same "through" cable as the PC.
Add the Lantronix USD 200
First add the Lantronix USD 200 to your local area network.
Then, use the Lantronix configuration tool, "DeviceInstaller" to discover the USD 200, give it an appropriate IP address, and set up the Lantronix serial port for:
Baud rate: 4800
Data bits: 8
Parity: none
Stop bits: 1
Flow control: none

Back in the Design Module, go to the "More Ports" layer.
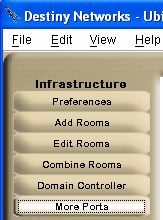
Click on the floor plan in the room in which you would like to put the Lantronix USD 200.
![]()
Be sure to select the correct model.
Enter the name.
Enter the same IP address that appeared on the Lantronix DeviceInstaller application
Click OK.

Add the UPB lighting system
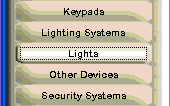
Select the Lighting Systems layer of the Design Module.
Click in the location in the room in which you plan to install the PIM.
![]()
You will get a pop up menu like the one at the right.
Type: select "Universal Powerline Bus".
Name: the default name is usually good, but you can change it if you want.
Baud Rate: UPB uses 4800 baud, only. The Design Module know that.
Serial Port: use the dropdown to select the Lantronix serial port.
Click OK.

After clicking OK on the menus above, a lighting icon will appear where you initially clicked to add the lighting system.
Add a Light
Select the Lights layer of the Design Module.
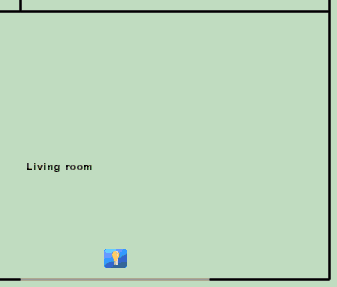
Click in the location in the room where you would like to add the light.
![]()
You will get a pop up menu like the one at the right. Please see the Lights layer for more information on the menu.
Type: select the type of light to automatically name the device.
Name: change the name if you would like. Note that each light in a room must have a unique name.
Select whether this light is dimmer capable.
Click the checkbox to the left of "Controlled by (and wired to).
Use the dropdown box to the right of "Controlled by" to select Universal Powerline Bus.
Enter the Network ID - typically 1. Note that as additional lights are added, entering the Network ID will not be necessary.
Enter the Unit ID from the pint out you got from UPStart.
Click "OK".

An icon for the device will appear.
In the Browser GUI, the Room menu will now have the icon of a Light as a device that can be controlled. Each of the Room Scenes will have a default value for the light. The Light will have been added to the Action Tree so that it can be used for Timer Events, GUI Buttons, and Keypad Events.
Add a Keypad
Universal Powerline Bus (UPB) has a different concept for keypad buttons than other lighting systems. Therefore, the Design Module treats them differently, as well. In UPB, any keypad button can transmit any "Link address" - unlike most lighting systems where keypads transmit the address of the keypad and the button that was pressed. To accommodate this difference, when you add a UPB keypad to the Design Module, you will get a very big keypad - one that lists all possible "Link addresses" that can be transmitted by a keypad button press (or a light switch press, also, for that matter).
Therefore, use UPStart to configure the desired keypad buttons to send the desired link numbers. Do the same for any UPB light switches for which you would like the Domain Controller to take an action.
Then, in the Design Module, use the buttons that represent those link addresses to define the actions you would like the Domain Controller to take.
For example, if you would like the "A" button of a keypad to turn on the TV to watch the DVD player, then create a link address in UPStart named something like "Theater Watch DVD - link 16" that uses Link address = 16, and use UPStart to assign that link to the "A" button of the appropriate keypad with a mode of "On Button" (or toggle, rocker, bright, or dim). Then, in the Design Module, go to the keypad layer and add a keypad as defined below. Click on the button labeled "?Link 16?" and use the Action Tree to select "Watch DVD on the Theater TV and Theater Speakers".
Hence, pushing button "A" of the keypad will transmit link address "16", which will cause the action assigned to button 16 to occur, which will play the DVD player.
Select the Keypad layer of the Design Module.
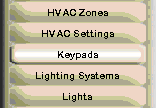
Click anywhere on the floor plan as this keypad will represent all keypad events throughout the house (on the defined network).
![]()
Select "Universal Powerline Bus" as the manufacturer.
For the Model, select "All".
Each "button" on the menu represents a UPB "Link address" (the question marks before and after the addresses imply that the Domain Controller will not do anything with the Link name).
Click on a button corresponding to the Link address the Domain Controller will receive from the UPB PIM. Use the Action Tree to select the event you would like to occur when this Link address is transmitted by a UPB keypad or light switch.
At the bottom of the menu, enter the "Network ID" in decimal format (the same way it appears in UPStart).
Click OK.
The keypad is now operational.
