Software support for Security Systems and HVAC involves an additional
charge for each end system. After purchasing the additional CD, install
and run the application on your PC. It will enable these 2 additional
layers of the Design Module.
|
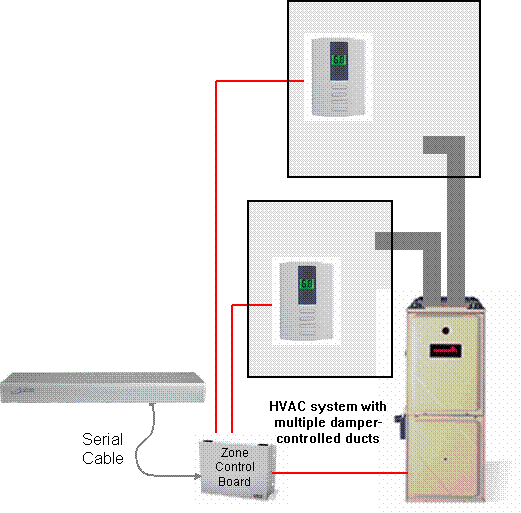
The Architecture of the HVAC System is shown
at the right. The Domain Controller is connected to the 3rd Party HVAC
controller via a serial cable. The HVAC Controller demands heating and
cooling from the HVAC furnace and air conditioning system which has damper
controlled ducts going to two or more zones consisting of one or more
rooms and a Thermostat to set the desired temperature. |
|
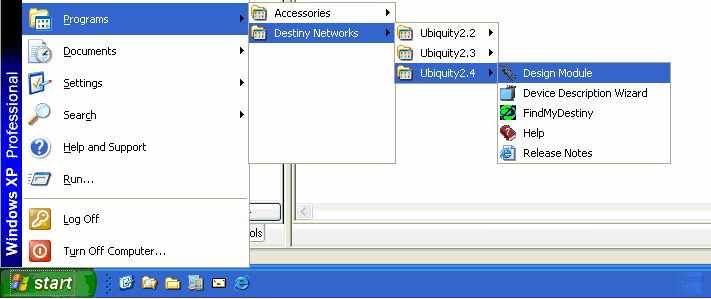
Run the
Design Module
Click "Start", "Programs",
"Destiny Networks", "Ubiquity 2.4", "Design Module" |
|
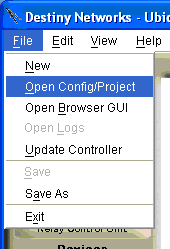
Open the Project:
Rooms edited.ubq
To open the project, select "File",
"Open Config/Project" |
|
|
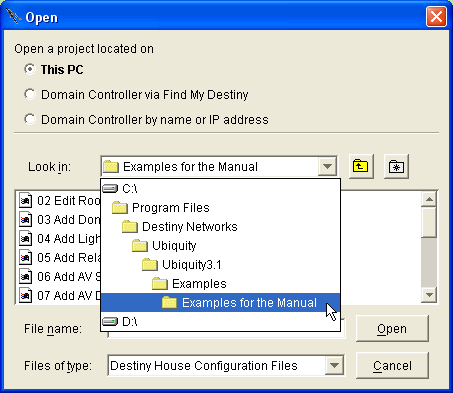
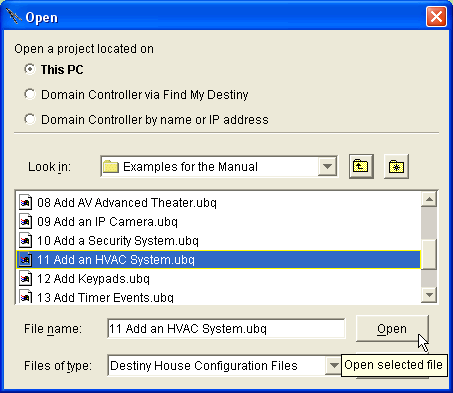
You will get the following menu.
Navigate to "C:\Program Files\Destiny
Networks \Ubiquity \Ubiquity3.1\Examples\Examples for the Manual" |
|
|
You will get the following menu.
Click on the project "11 Add an HVAC
System.ubq"
Click the "Open" button
The project will open. |
|
Add
a HVAC system with 3 zones
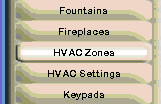
Select the HVAC Zones layer of the Design
Module. |
|
|
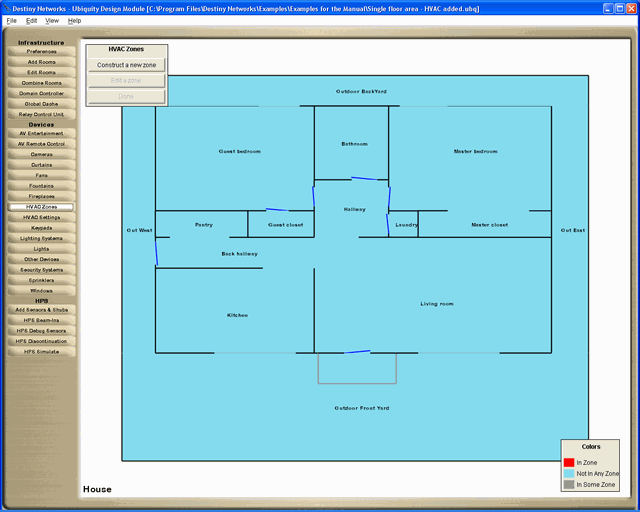
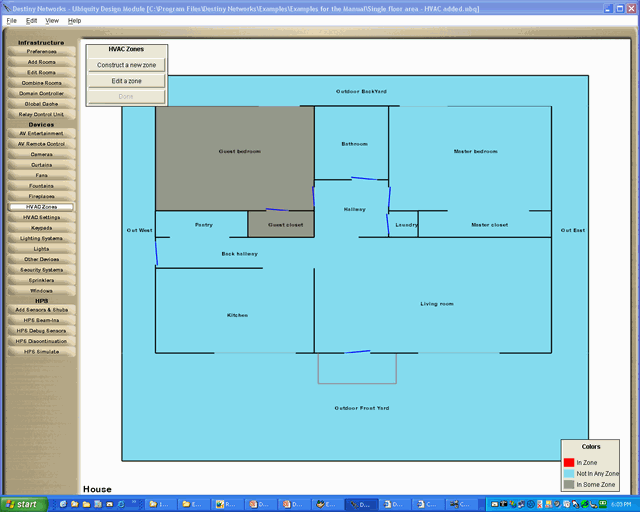
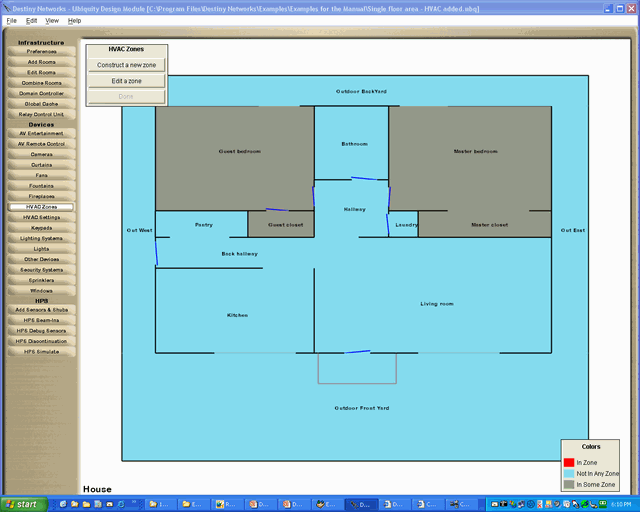
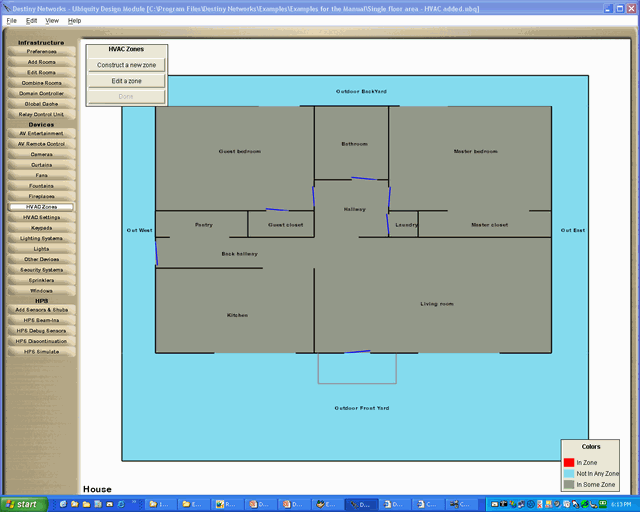
You will get a window like the one at the
right.
All the rooms are blue indicating that none
are in an HVAC zone yet.
Click "Construct a new zone" on
the HVAC zones menu in the upper left.
|
|
|
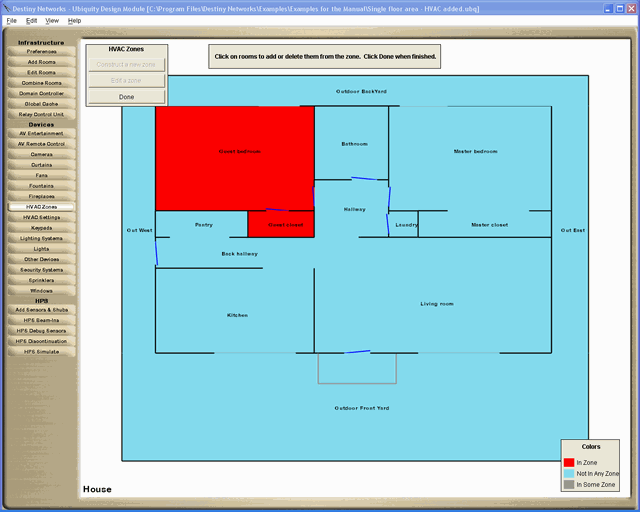
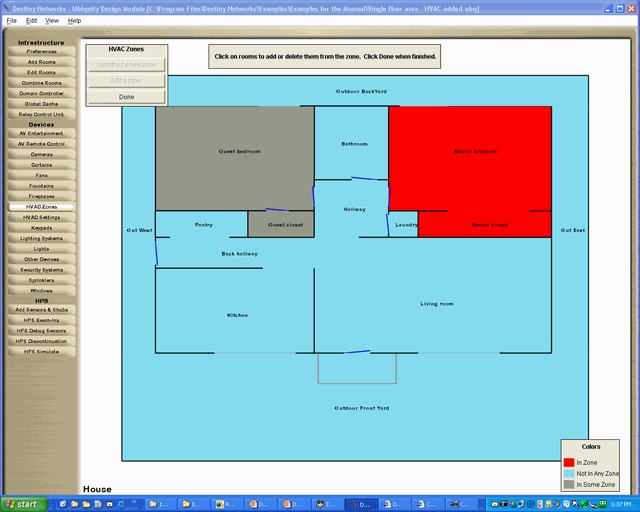
Directions will pop up at the top of the menu
telling you to click on the rooms that are in the HVAC zone that you are
constructing. Note that each HVAC zone will have its own thermostat.
Click on the Guest bedroom and Guest closet.
Both will turn red indicating that they are selected for the HVAC zone
being created.
Click "Done" on the HVAC zones menu
in the upper left. |
|
|
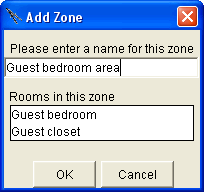
You will get the "Add Zone" menu.
Type in "Guest bedroom area" as
the name of this HVAC zone.
Click OK
|
|
|
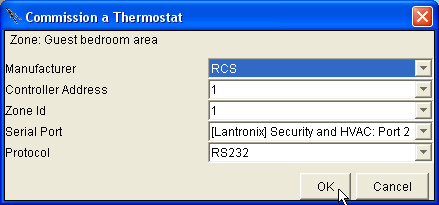
You will get the "Commission a Thermostat"
menu.
Select RCS as the Manufacturer.
It's possible to have multiple RCS controllers
in a house, and the multiple controllers can be wired to the same (RS-485)
serial wire. If this was one of them, then you would need to indicate
the "Controller Address" on RS-485 of this controller. However,
our controller is on RS-232 so this field can be ignored.
The RCS HVAC controller can one or more thermostats
connected to it. You must check the ID of the thermostat for this zone
and enter it in the Zone ID field. We will assume this thermostat has
a zone ID of "1".
Select the Serial Port to communicate with
the RCS HVAC controller.
Select RS232 as the protocol (instead of RS-485).
Click OK
|
|
|
After clicking OK you will be ready to Construct
another HVAC zone. The 2 rooms that were added to the Guest bedroom area
are now gray indicating that they are part of some zone.
Click "Construct a new zone" on
the HVAC zones menu in the upper left.
|
|
|
Click on the Master bedroom and Master closet.
Both will turn red indicating that they are selected for the HVAC zone
being created.
Click "Done" on the HVAC zones menu
in the upper left. |
|
|
You will get the "Add Zone" menu.
Type in "Master bedroom area" as
the name of this HVAC zone.
Click OK |

|
|
You will get the "Commission a Thermostat"
menu.
Select RCS as the Manufacturer.
We will assume this thermostat has a zone
ID of "2".
Select the Serial Port to communicate with
the RCS HVAC controller.
Select RS232 as the protocol (instead of RS-485).
Click OK
|

|
|
After clicking OK you will be ready to Construct
the last
HVAC zone. The 2 rooms that were added to the Master bedroom area are
now gray also indicating that they are part of some zone.
Click "Construct a new zone" on
the HVAC zones menu in the upper left. |
|
|
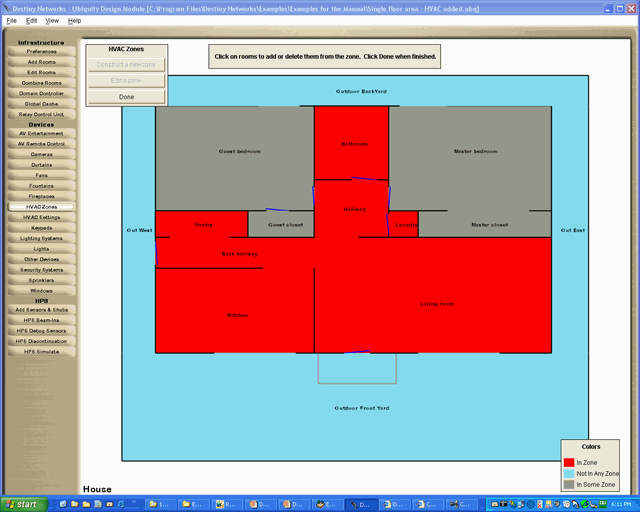
Click on all of the other rooms. They will
all turn red indicating that they are all selected for the HVAC zone being
created.
Click "Done" on the HVAC zones menu
in the upper left. |
|
|
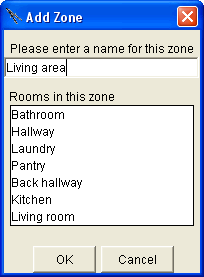
You will get the "Add Zone" menu.
Type in "Living area" as the name
of this HVAC zone.
Click OK |
|
|
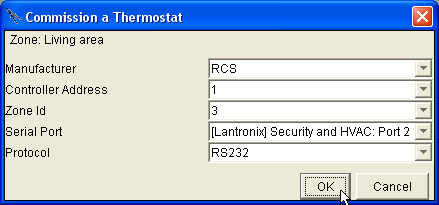
You will get the "Commission a Thermostat"
menu.
Select RCS as the Manufacturer.
We will assume this thermostat has a zone
ID of "3".
Select the Serial Port to communicate with
the RCS HVAC controller.
Select RS232 as the protocol (instead of RS-485).
Click OK
|
|
|
Now all the inside rooms are part of some
HVAC zone. |
|
Check
that the Browser GUI now has HVAC icons in all rooms
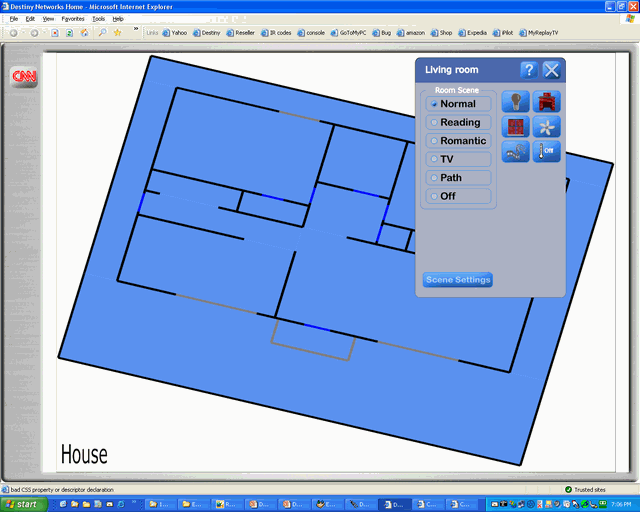
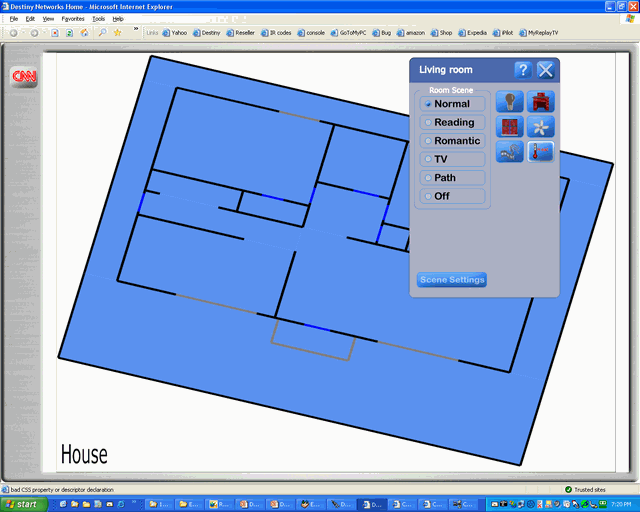
Click in the Living room to open the Room
menu
Note the HVAC icon indicating that the HVAC
is now Off
Close the room menu in the Living room
|
|
|
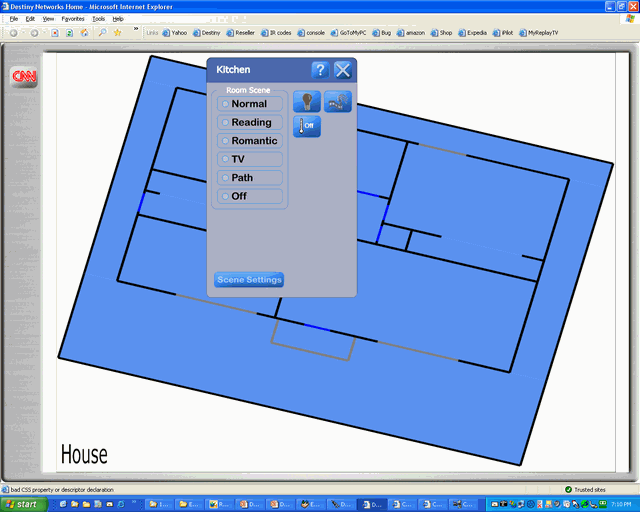
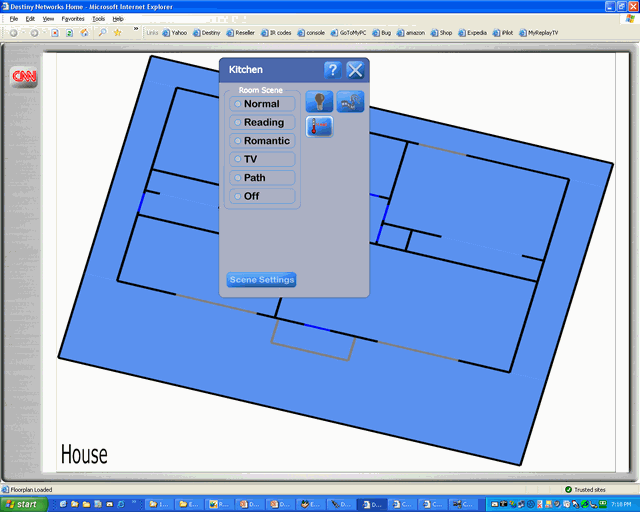
Open the Room menu in the Kitchen (part of
the same HVAC zone), note it is off also
Check the other rooms
|
|
Turn
the thermostat on to Heating in the Kitchen, note that it turns on in
the Living room
Click on the HVAC icon on the Room menu to
bring up the thermostat for the Living area
|
|
|
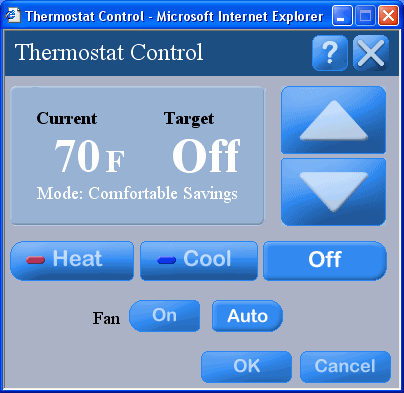
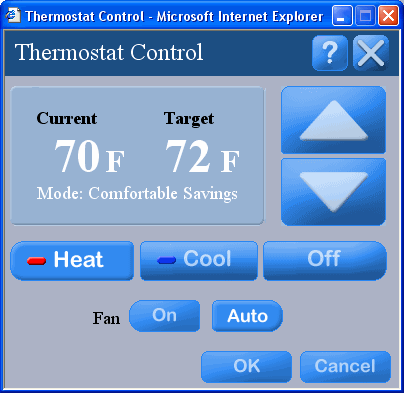
For the thermostat control in the Kitchen,
click the “Heat” button, use the up arrow keys to set the "Target"
temperature to 72 degrees, and click OK
|
|
|
Note the icon for the HVAC in the Room menu
of the Kitchen is now showing “Heat” mode
|
|
|
Open the Room menu in the Living room, it
is also now showing “Heat” mode
|
|
|
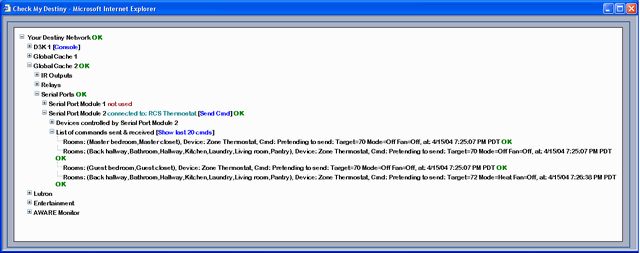
Check
My Destiny now shows the commands that were sent to the RCS controller
for the Living area |
|