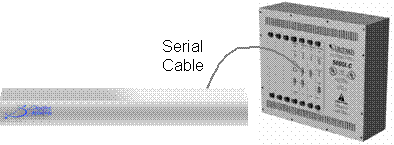
LiteTouch 5000 LC Architecture
The Domain Controller connects to the LiteTouch 5000 LC processor via an RS-232 interface. All keypad pushes are sent from the LiteTouch 5000 LC to the Domain Controller. Commands to set the lighting load to a certain dimming value are sent from the Domain Controller to the LiteTouch 5000 LC system.
Domain 3000 and Global Cache Wiring
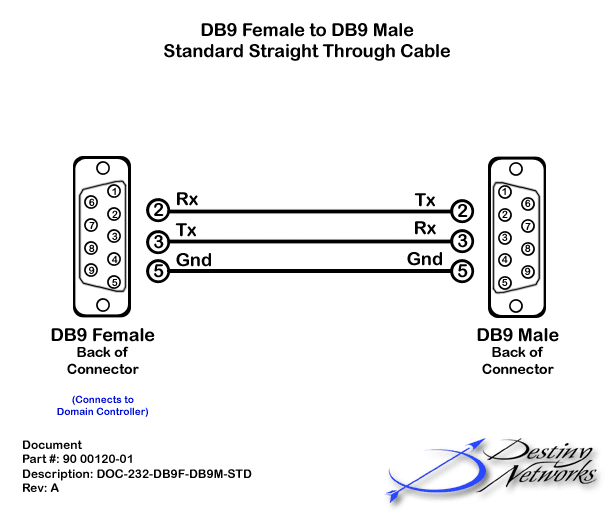
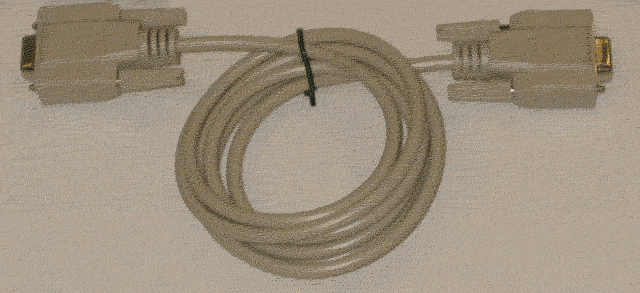
Connect a standard straight through RS-232 cable from a serial port on the back of the Domain 3000 to serial port 1 of the CPU board of the LiteTouch 5000 LC controller as shown.
Notification
As it is shipped from the factory, the LiteTouch 5000 LC does not communicate internal events out of the serial ports of the LiteTouch 5000 LC system. However, the Domain Controller needs this information to learn about keypad presses. LiteTouch refers to this as turning on notification.
Connect your PC to serial port 1 of the LiteTouch 5000 LC CPU (note that this is the port that the Domain Controller will connect to).
Get the LiteWare program from the LiteTouch 5000 LC system by doing the following:
Open LiteWare on your PC.
Make sure you have a new project opened up.
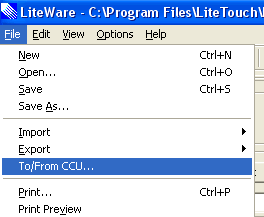
From the dropdown menu at the top left, select "File", "To/From CCU..."
You will get the menu at the right.
Click the 2nd button down from the top right labeled "From 5000LC".
You will get a pop up menu asking you the name of the file you would like to save the program to. Enter any name you like and click Save. If you get the error message "Error 3 downloading from 5000LC" it is because another program on you PC is using the COM port that LiteWare wants to use (close Hyper Terminal and Palm Pilot).
The program will be transferred to your PC and the red bar at the right will turn blue.
Click OK to exit the "Communication Properties" menu.

After transferring the project to your PC, you need to open it on your PC by selecting "File", "Import >", "Import 5000LC Program File".
In the pop up menu, select the file name of the project that you just transferred to your PC and click Open.

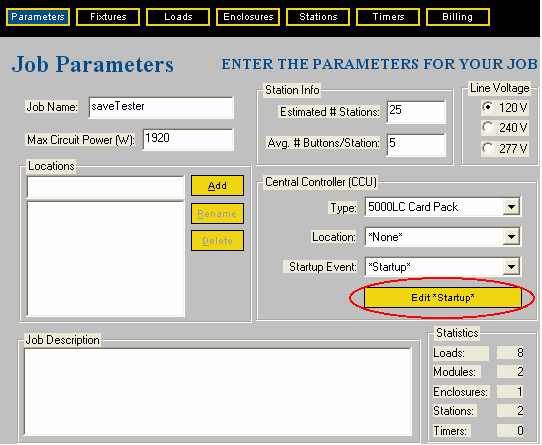
It will open to the "Parameters" menu.
For "Startup Event" (the label just above the red circle on the menu at the right) select "Startup", as shown at the right.
Click the button labeled Edit "Startup" as shown at the right in the red circle.
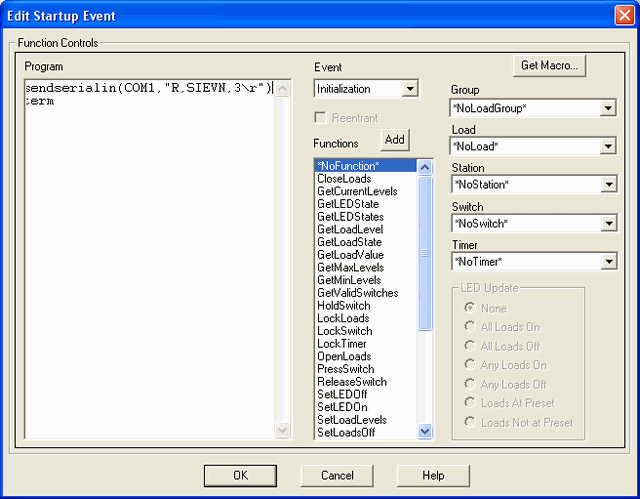
You will get the "Edit Startup Event" menu.
The left hand white box will probably be empty. Copy the first line below (just the line - not the carriage return at the end of the line) and paste it into the box..
sendserialin(COM1,"R,SIEVN,3\r")
With you curser still in the text box of the Edit Startup Event menu. press "Enter" and type: "term" without the quotes. Do not press Enter at the end of that line.
The result should look like the example at the right.
Click OK.
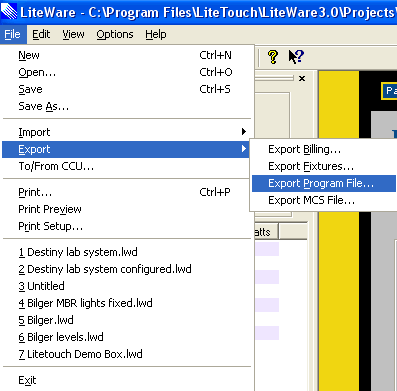
Compile the project by selecting "File", "Export >", "Export Program File..."
Select the same project name you downloaded previously and append to it the words, "with notification" (or any other words you want to indicate that this project has notification in it).
Click OK.
Upload the project to the LiteTouch 5000 LC by selecting "File", "To/From CCU..."
You will get the menu at the right.
Make sure the Baud Rate is 9600.
Click the upper right button labeled "To 5000LC".
It will bring up the File menu. Click on the file you just saved - the one "with notification", and click Open.
The project with the notification startup event will be loaded into the LiteTouch 5000 LC.
Note that the serial port of the LiteTouch 5000 LC that is connected to your PC is the serial port that is enabled with notification, and it is the one that must be connected to the Domain Controller.
However, you must reboot the LiteTouch 5000 LC for the startup event to execute. Therefore, power cycle the LiteTouch 5000 LC by turning the switch off and on.
Test the communication of the LiteTouch 5000 LC
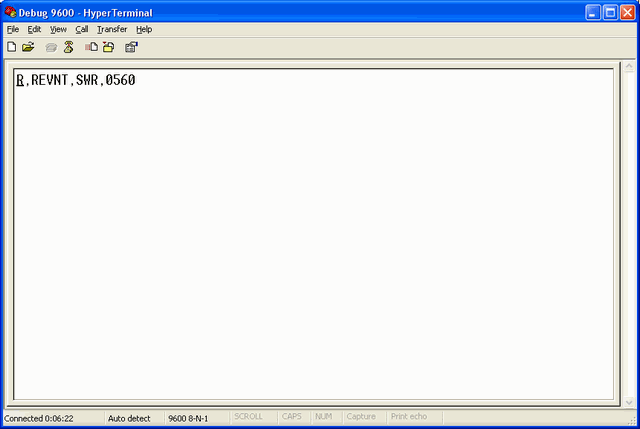
With the LiteTouch 5000 LC still connected to your PC with a commercially bought RS-232 cable, open up Hyper Terminal at 9600 baud.
Push a button on a LiteTouch keypad.
You should get a line of characters on the Hyper Terminal similar to those shown in the example at the right. If you do not get a line of characters, repeat the procedure or call Destiny support. As a last resort, you can call LiteTouch support at 800 527 5527 and tell them you are trying to get the LiteTouch system to provide notification on serial port 1 of the CPU.
Test the cable to the LiteTouch 5000 LC
Disconnect the commercially bought RS-232 cable from your PC and from the LiteTouch 5000 LC.
Connect the LiteTouch 5000 LC side of the cable that goes to the Domain Controller to serial port 1 of the CPU board of the LiteTouch 5000 LC.
For the Domain 3000: connect the Domain Controller side of the cable to your PC.
Repeat the communication test above to prove that the cable is good.
Once you know the cable is good, plug the cable into the Domain Controller.
Software
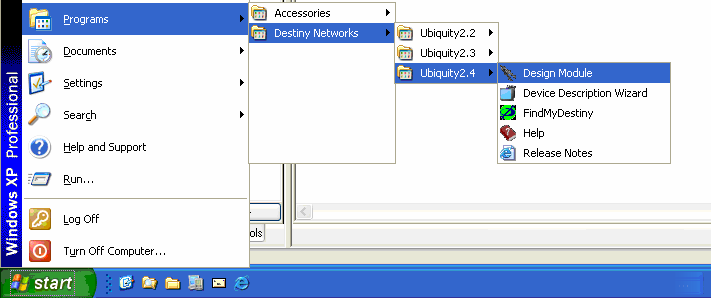
Run the Design Module.
Add the LiteTouch 5000 LC lighting system
Select the Lighting Systems layer of the Design Module.
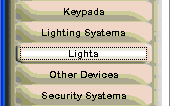
Click in the location in the room in which you plan to install the Lighting System.
![]()
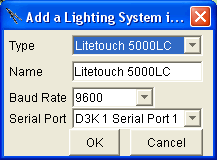
You will get a pop up menu like the one at the right.
Type: select LiteTouch 5000 LC
Name: the default name is usually good, but you can change it if you want.
Baud Rate: 9600 is the only option.
Serial Port: use the dropdown to select the appropriate serial port.
Click OK.
After clicking OK on the menus above a red dot will appear where you initially clicked to add it.
Add a Light
Select the Lights layer of the Design Module.
Click in the location in the room where you would like to add the light.
![]()
You will get a pop up menu like the one at the right. Please see the Lights layer for more information on the menu.
For "Controlled by" use the dropdown to select "LiteTouch 5000LC".
For the "Module Number", enter the "Module Address" number of the module controlling this load as found on the "Enclosure" page of the LiteWare program.
For the "Load Number" do not enter the load number. Rather enter the "Port #" of the module controlling this load as found on the "Enclosure" page of the LiteWare program - after opening up the module this load is connected to.
Click OK.
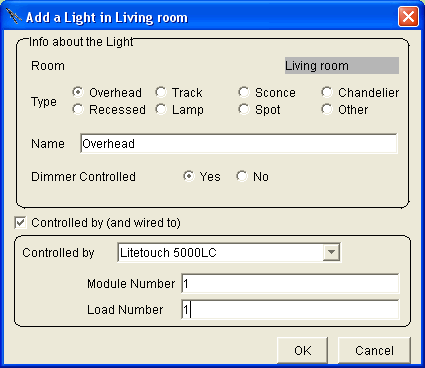
An icon for the device will appear.
In the Browser GUI, the Room menu will now have the icon of a Light as a device that can be controlled. Each of the Room Scenes will have a default value for the light. The Light will have been added to the Action Tree so that it can be used for Timer Events, GUI Buttons, and Keypad Events.