Lantronix USD 100 and 200 Ethernet to Serial

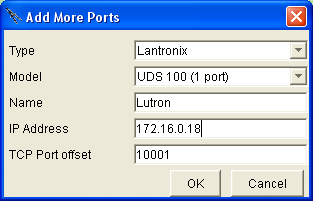
If you need more RS-232 ports than are available on the Domain Controller or if you have a number of RS-232 ports in one location and would rather pull just one Ethernet to that location, then you will want to add a Lantronix USD 100 or USD 200 (www.lantronix.com) to the project.

Note that the USD 100 and 200 must be powered up before, or at the same time as, the Domain controller. If the Domain Controller is up and running and the USD does a power cycle, it may lose communication with the Domain Controller.

There are 2 models to choose from. The USD 100 supports 1 serial port and the USD 200 supports 2 serial ports. Both are 4" L x 4" W x 0.9" H in size and have the following attributes:

 
Serial Interface
  • Baud rate: 300 to 115,200 bps

  • Characters: 7 or 8 data bits

  • Parity: odd, even, none

  • Stop bits: 1 or 2

  • Connector: USD 100 is DB-25, USD 200 is DB-9

  • USD 100 is any of RS-232, 422, 485, but only RS-232 is supported in this release

  • USD 200 is RS-232 only

Note that on the USD 200, serial port 1 is on the right.

Network Interface
  • 10/100 Ethernet

  • Connector: RJ45

  • LEDs: Power, 10 Link/Activity (green), 100 Link/Activity (green), Diagnostics (red), Status channel 1 (green), Status channel 2 (red)


Lantronix USD 100 or USD 200 Architecture

The Lantronix USD 100 or USD 200 connects to the Domain Controller via an IP network. The IP network can be Ethernet, WiFi, HomePlug or some combination of these or other media running IP over them.


Select the More Ports Layer

Select the "More Ports" layer of the Design Module.


Add RS-232 to RS-485 Converter

Click in the location in the room where you want to add the RS-232 to RS485 converter (typically, close to the Domain Controller).


For the "Type" select "RS232 to RS485 Converter".

For "Manufacturer" select "B and B Electronics"

For the "Model" select "4850T9L".

For the "Serial Port", select the serial port you would like to connect it to.

Create a new name or use the default

Click OK.

You now have an RS-485 port that will show up as a serial port whenever you select the RS-485 protocol.


For example, at the right is the menu for connecting it to Aprilaire.


Test Out the Lantronix

Before using the USD 100 or 200 with the Domain Controller, it is important to test out the connection first.

Use the Lantronix getting started guide to assign a Fixed IP Address to the USD device (do not use DHCP).

Before assigning the IP address, open up a browser to the Router/DHCP server on the network (typically, by typing http://172.16.0.1, or 192.168.0.1) and find out which IP addresses can be assigned as fixed IP addresses. In addition, most routers allow you to enter fixed IP address devices to their database. You will want to do this, also, so that the DHCP server does not assign this number to another device on the network.


The information below is for their older software release which was very confusing to understand how to get it to work. The new software release for the Lantronix is reasonable intuitive: Search for the device and Set the IP address.


Disconnect the serial port from the Lantronics device.

Open your web browser to the IP address of the USD 100 or 200.

Select "Port Properties".

Click the "Factory Settings" button - the 7th button down on the left. Wait for the display to refresh. Wait another 10 seconds.

If you are configuring a USD 200, select "Channel 1" which is the serial port on the right side of the USD 200.

Use the dropdown menus on the right to select the baud rate, etc. Note that the Domain Controller cannot set the baud rate of these devices. They must be set by hand in this fashion.

Skip down the page to the "Local Port" address. It should be 10001 for "Channel 1".

Ignore the rest of the page.

If you made any changes, you must click the "Update Settings" button. The device will reboot. Wait for the display to refresh. Wait another 10 seconds.

If you are configuring a USD 200, select "Channel 2" and enter the attributes of the devices you are controlling. Make sure the "Local Port" of Channel 2 is set to 10002. Click "Update Settings". Wait for the display to refresh. Wait another 10 seconds.


Important

If you made any changes at all to the configuration of the USD 100 or 200, reset the power to the device by unplugging it and then plugging it back in. Re-open your browser to the device and verify that the changes you made still exist. If they do not, re-enter them.

Immediately after verifying that the changes are correct, open your browser to the Domain Controller (using Find My Destiny). If your PC can reach both devices, then the Domain Controller can reach the Lantronix USD 100 or 200.


Software

Select the "More Ports" layer of the Design Module.


Click in the location in the room in which you plan to install the Lantronix USD 100 or 200.


You will get a pop up menu like the one at the right.

From the "Type" dropdown box, select "Lantronix".


From the "Model" dropdown, select either the USD 100 (1 port) or the USD 200 (2 ports).

Enter a name for this serial port. In "Check My Destiny" it will be referred to as "Lantronix" and then the name you give it. This will also be the case when you assign the port to a lighting system, AV device, or other device via RS-232.

Enter the IP address of the Lantronix USD 100 or USD 200. You must enter an IP address at this time.

Make sure to leave the "TCP Port offset" as "10001".

Click "OK".


After adding the Lantronix USD 100 or USD 200, a red dot will appear where you initially clicked to add it. If you want to change any of the parameters of it, click on the red dot and make sure the "Edit More Ports" menu pops up. It is the one that also has a "Delete" button on it - otherwise, you will be adding a second Lantronix USD 100 or USD 200.

Power cycle the Lantronix.

Note that the USD 100 and 200 must be powered up before, or at the same time as, the Domain controller. If the Domain Controller is up and running and the USD does a power cycle, it may lose communication with the Domain Controller.


Wire it up for RCS 8CUR

For the RCS 8CUR Relay Controller


Make sure the B+ and A- wires are a twisted pair.


The dip switch settings should be:


The RS232 is a straight through cable to the Domain Controller.